Overview
This page provides instructions for upgrading the NanoVNA firmware with a Windows PC using the DfuSe application.
Download the DFU File
DFU files for the (edy555) NanoVNA releases can be found here:
DFU files for the (hugen79) NanoVNA-H releases can be found here:
Download & Install DfuSe
If you don't have the DfuSe application, download and install it from ST Microelectronics using the link below, and clicking on the "Get Software" button. After completing all of the on-line questions, ST will send a download link to the email address provided.
There wasn't anything unusual about the installation. When it completes, you should get a blank DfuSe window that looks like this:
Connect to the NanoVNA in DFU Mode
In order to program the VNA it must be connected to a Windows PC using a USB cable, and then placed into the DFU mode.
For later NanoVNAs you should be able to enter the DFU mode with the menus using CONFIG > DFU > RESET AND ENTER DFU. If this option is available, it is the preferred method.
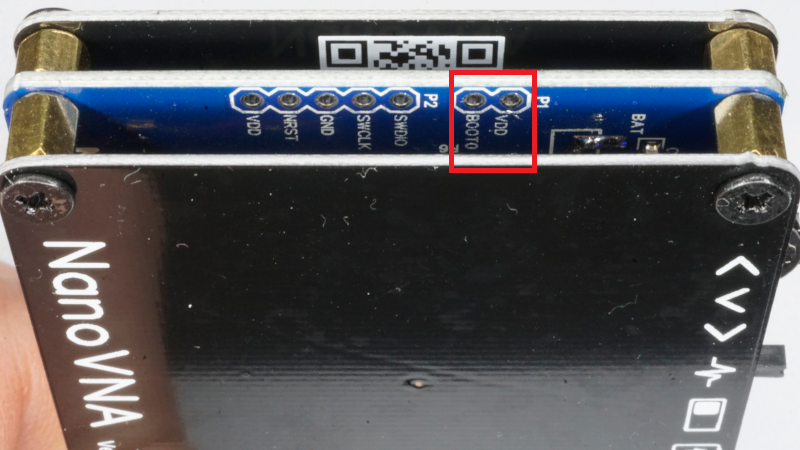
If the menu options are not available, then the BOOT0 and VDD pins on the PCA must be shorted together when the device is turned on in order to enter DFU mode. When done successfully this should result in a white screen on the NanoVNA.
Programming the NanoVNA
Shortly after the NanoVNA enters DFU mode, it will appear on Windows as a USB device, and it will be automatically recognized by the DfuSe application. If all goes well, the NanoVNA should appear in the list of "Available DFU Devices", and will be automatically selected by default if it is the only attached DFU device. The DfuSe window should look like this:

On the DfuSe app select the "Choose..." button, and navigate to where you saved the DFU file. Also check the "Verify after download" checkbox. Afterwards, the DfuSe application should look this:

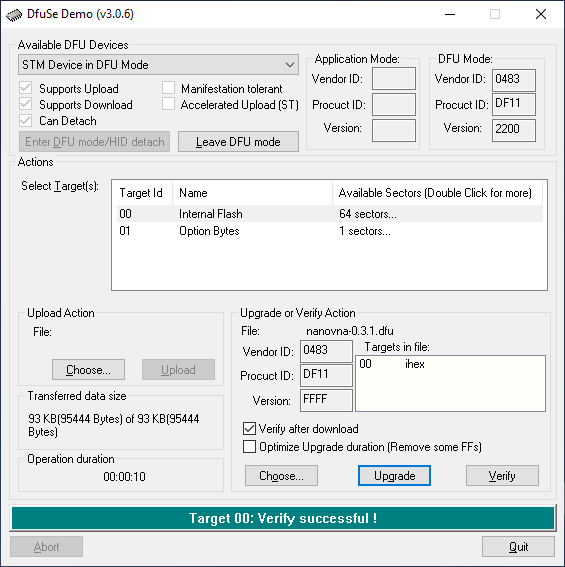
Click the "Upgrade" button, and the upgrade should begin immediately. After everything is complete, you should see a "Verify successful !" confirmation that looks like this.
Checking the NanoVNA FW Version
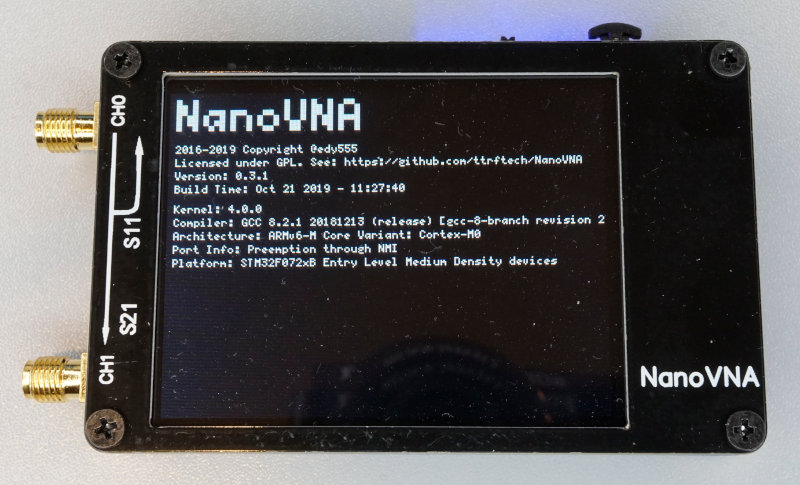
After the DFU upgrade completes successfully, disconnect the NanoVNA, turn it off, wait a few seconds, and turn it back on. Using the menus, check the NanoVNA firmware information using CONFIG > VERSION. The displayed version number should match the version of the DFU file selected. The version display should look like this:
That's it. The NanoVNA should now be programmed with the desired firmware version.