Overview
This example uses the TIMERA2 hardware library to generate a sequence of blocking delays that blink the LEDs. Blocking delays are very simple to use and understand, and can be useful for creating very simple programs quickly. They have a significant drawback however in that they prevent the processor from performing other tasks while it waits for the delay to complete.
Required Hardware
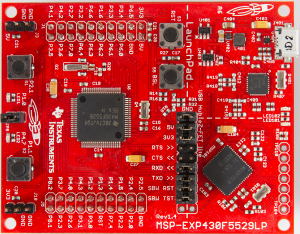
This example only requires the MSP430F5529LP development board.
Required Libraries
In order to build the example project, follow the instructions here for how to create and configure a new project. This example requires the following operating environment files:
- MSP430F5529LP.h
- MSP430F5529LP.gel
- MSP430F5529LP_CLOCK.h
- MSP430F5529LP_CLOCK.c
- MSP430F5529LP_TIMERA2.h
- MSP430F5529LP_TIMERA2.c
Example Code
The example code is provided as a main.c file that is available on GitHub at (Blink_LED_Blocking_Timer), or if preferred, it can be cut-pasted from the window below.
/* ########################################################################## */ /* * This file was created by www.DavesMotleyProjects.com * * This software is provided under the following conditions: * Permission is hereby granted, free of charge, to any person obtaining * a copy of this software and associated documentation files (the * 'Software'), to deal in the Software without restriction, including * without limitation the rights to use, copy, modify, merge, publish, * distribute, sublicense, and/or sell copies of the Software, and to * permit persons to whom the Software is furnished to do so, subject to * the following conditions: * * THE SOFTWARE IS PROVIDED 'AS IS', WITHOUT WARRANTY OF ANY KIND, * EXPRESS OR IMPLIED, INCLUDING BUT NOT LIMITED TO THE WARRANTIES OF * MERCHANTABILITY, FITNESS FOR A PARTICULAR PURPOSE AND NONINFRINGEMENT. * IN NO EVENT SHALL THE AUTHORS OR COPYRIGHT HOLDERS BE LIABLE FOR ANY * CLAIM, DAMAGES OR OTHER LIABILITY, WHETHER IN AN ACTION OF CONTRACT, * TORT OR OTHERWISE, ARISING FROM, OUT OF OR IN CONNECTION WITH THE * SOFTWARE OR THE USE OR OTHER DEALINGS IN THE SOFTWARE. * */ /* ########################################################################## */ /* ===========================================================================*/ /* * This program blinks the LEDs on the Texas Instruments MSP430F5529 Launchpad * development board using the arduino style blocking delay function provided * in the TIMERA2 peripheral files. * * This example code demonstrates how to use basic "delay" functionality to * perform tasks. These can make it extremely simple to write a small program. * However, this example code also spends all of its time doing nothing but * performing this task, which is a significant waste of the processor's * capability. * * An alternative method would be to use non-blocking delays, and allow the * main loop to perform other tasks until the delay expires. This will be * explained in a separate non-blocking delay example. * * Version 1.0 * * Rev. 1.0, Initial Release * Rev. 1.1, Minor editorial updates and cleanup * * */ /* ===========================================================================*/ #include "MSP430F5529LP.h" #include "MSP430F5529LP_CLOCK.h" #include "MSP430F5529LP_TIMERA2.h" /****************************************************************************** PUBLIC DEFINITIONS ******************************************************************************/ /****************************************************************************** PUBLIC VARIABLES ******************************************************************************/ /****************************************************************************** PRIVATE DEFINITIONS (static const) ******************************************************************************/ /****************************************************************************** PRIVATE FUNCTION PROTOTYPES (static) ******************************************************************************/ static void initialize(void); /****************************************************************************** PRIVATE VARIABLES (static) ******************************************************************************/ /****************************************************************************** Subroutine: main Description: program entry point at startup. Inputs: None Outputs: 0 ******************************************************************************/ int main( void ) { // perform initialization initialize(); for (;;) // Loop forever... { delay(500); // blocking delay of 1/2 second P1OUT_bits.P1OUT0 ^= 1; // Toggle P1.0 (LED1) delay(500); // blocking delay of 1/2 second P1OUT_bits.P1OUT0 ^= 1; // Toggle P1.0 (LED1) P4OUT_bits.P4OUT7 ^= 1; // Toggle P4.7 (LED2) } return 0; } /****************************************************************************** Subroutine: initialize Description: Performs the initalization of the main program. This also initializes the MSP430F5529LP operating environment. Inputs: None Outputs: None ******************************************************************************/ void initialize(void) { // ################################################################### // Add operating environment initialization here MSP430F5529LP_CLOCK_Initialize(); MSP430F5529LP_TIMERA2_Initialize(); // ################################################################### // Add program specific initialization here // Enable the Debug LEDs P1DIR_bits.P1DIR0 = 1; // Set P1.0 (LED1) to an Output P4DIR_bits.P4DIR7 = 1; // Set P4.7 (LED2) to an Output P1OUT_bits.P1OUT0 = 0; // Set P1.0 initial value P4OUT_bits.P4OUT7 = 1; // Set P4.7 initial value // ################################################################### // Last step before exiting, enable global interrupts __enable_interrupt(); // IMPORTANT: Even though the main code does not use interrupts in this // example, it is necessary to enable interrupts so that the rest of the // operating environment operates correctly. } /****************************************************************************** End of File: main.c ******************************************************************************/ |
Initialization
In the example code there are 3 main sections to the initialization. The first section is the initialization of the operating environment files, the second section includes application specific initialization, and finally the third section is the enable of the global interrupts. It is recommended that all projects using the operating environment follow this convention.
void initialize(void)
{
    // ###################################################################
    // Add operating environment initialization here

    MSP430F5529LP_CLOCK_Initialize();
    MSP430F5529LP_TIMERA2_Initialize();


    // ###################################################################
    // Add program specific initialization here

    // Enable the Debug LEDs
    P1DIR_bits.P1DIR0 = 1;         // Set P1.0 (LED1) to an Output
    P4DIR_bits.P4DIR7 = 1;         // Set P4.7 (LED2) to an Output
    P1OUT_bits.P1OUT0 = 0;         // Set P1.0 initial value
    P4OUT_bits.P4OUT7 = 1;         // Set P4.7 initial value


    // ###################################################################
    // Last step before exiting, enable global interrupts

    __enable_interrupt();
}
Section 1 - initialization of the operating environment
Since the CLOCK and TIMERA2 library modules are included in this example, the initialization for these modules is performed in section one. The standard convention for the operating environment is that every library module includes an initialization function, and that function must be called before the module or its functions are used. The order of initialization is not important, except for the following rules:
- 1) CLOCK initialization is always required, and must always be initialized first.
- 2) hardware library modules must be initialized before accessory library modules.
- ...as with most rules there is always one exception.
- 3) The BUTTON library module is a hybrid of hardware and accessory. If used, it must be initialized as the last hardware module.
Section 2 - application specific initialization
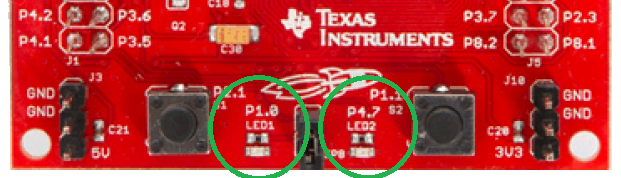
The applications specific initialization for this example sets the pin direction and initial state for the two user-controllable LEDs. LED1 (Red) is connected to pin P1.0, and LED2 (Green) is connected to pin P4.7. The example code sets both of these pins as outputs (Direction = 1) and then sets the initial (Output) state. Notice that one LED is set to 0 (off) and the other to 1 (on). This will create an alternating LED pattern.
|
Section 3 - enable global interrupts
The last sub-section simply enables the global interrupts. This should always be done as the last step during initialization, unless there is a very specific need to do it otherwise. The initialization of any interrupt driven library files will have enabled the interrupts for those modules, but they will not run until the global interrupts are enabled using __enable_interrupt();. It is important that the global interrupts are always enabled, as parts of the operating environment depend on it.
The Main Loop
The main function consists of a simple "forever loop" that executes a blocking delay of 500 ms, toggles LED1, executes another blocking delay of 500 ms, toggles LED1 and LED2, and repeats. This blinks LED1 (Red) once per second, and LED2 (Green) once every 2 seconds, and does it with very little code, and very little complexity. Blocking delays provide a nice way of doing simple things very simply. The down-side to using blocking delays is that the processing capability is wasted very quickly. In this example, the processor is at 100% utilization performing this very simple task, meaning that it has no time to perform any other tasks.
int main( void )
{
    // perform initialization
    initialize();

    for (;;)    // Loop forever...
    {
        delay(500);                 // blocking delay of 1/2 second
        P1OUT_bits.P1OUT0 ^= 1;     // Toggle P1.0 (LED1)
        delay(500);                 // blocking delay of 1/2 second
        P1OUT_bits.P1OUT0 ^= 1;     // Toggle P1.0 (LED1)
        P4OUT_bits.P4OUT7 ^= 1;     // Toggle P4.7 (LED2)
    }

    return 0;
}
The End Result
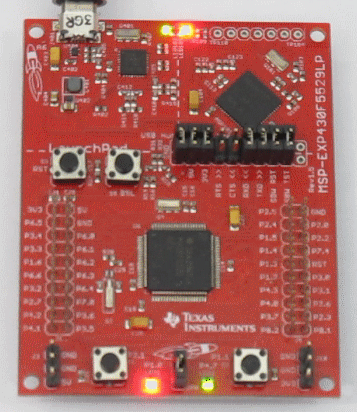
Once the example code is built and executed, the end result should be Red blinking once per second, and Green blinking once every 2 seconds, as shown below.
|
Now that the example code is up an running, consider changing a few things an see what happens. For example:
- Change the initial output state of the LEDs to be the same.
- Change one of the blocking delay values to have a shorter timeout, like 50 ms.
- Change the other blocking delay to have a shorter timeout, like 50 ms.
- Try making a larger sequence of delays to make other LED patterns.