Hi Ella. Merry Christmas!
You asked about hacking Minecraft, so I looked into it and put together a webpage for you. Along with the instructions for finding this page you should have received a little square box, a mouse, and a keyboard. Connect the box to any monitor or TV that has an HDMI input, apply power, and bingo, you have a working mini-computer! I have pre-installed a few things on your new mini-computer. In particular, a free version of Minecraft and programming libraries for you to be able to control it auto-magically. I also added a few example programs to get you started, which I will explain below.
A Little About "the Box"
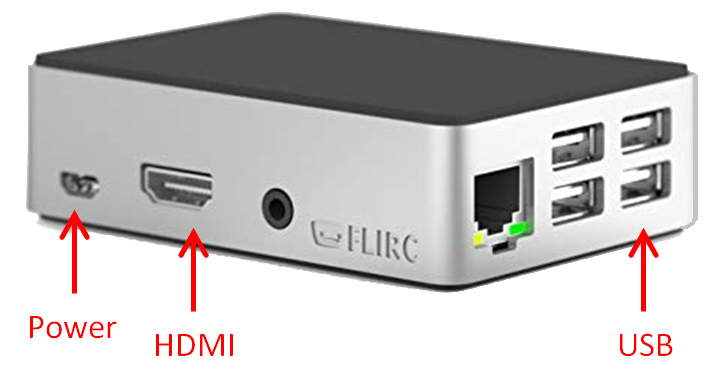
The computer inside the box is called a Raspberry Pi. It is single board computer running a Linux operating system called Raspbian. The board is mounted inside of an aluminum case to help keep it safe, and to make it look nice. There are three primary connections that you need to know about. They are marked on the picture below. There are four USB ports. In one of them you should see a small adapter plugged in that says "Logi" on it. That is the wireless adapter for the keyboard and mouse. There is an HDMI port that you use to plug into the HDMI input on a TV or monitor. You may have to select the HDMI port on the TV or Monitor. Finally, there is a power supply input. Plug that in last, and the computer will start booting up.
|
Getting Started
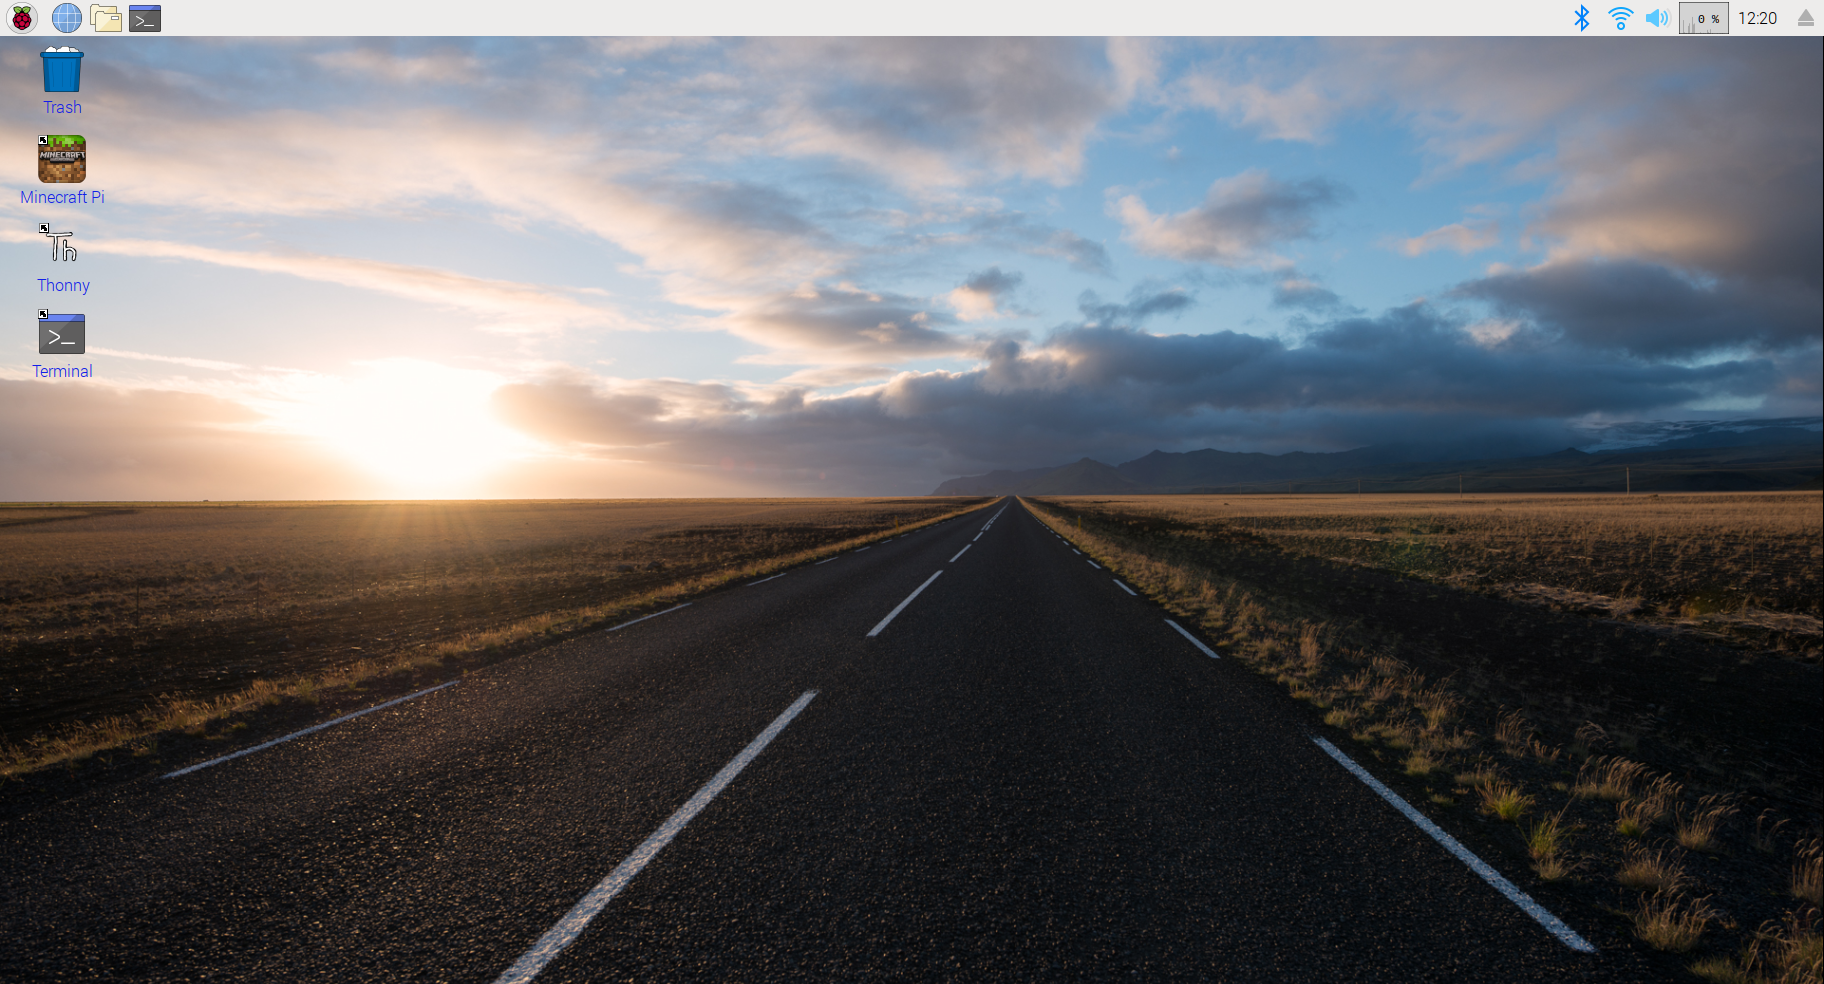
After the computer finishes booting up you will see a desktop like the one below. On the desktop there is an icon for "Minecraft Pi" and one for "Thonny". These are the applications that you will need to hack Minecraft. Before moving on I should probably talk about the desktop a little. The interface for Linux isn't too much different than windows, except that things are in different places than you would expect, and will look a little different. In this version of Raspbian, the equivalent of the Windows Start menu can be found by clicking the Raspberry icon in the upper-left corner. The equivalent of the Windows system tray is in the upper-right corner. Take some time to explore. After all this is your computer. One thing to remember, just like any other computer, before unplugging it, shut it down using the [Shutdown] command in the start menu. If it does get into a bad state, don't worry, it's really easy to reset it so that it is brand new again, just like the day you got it.
|
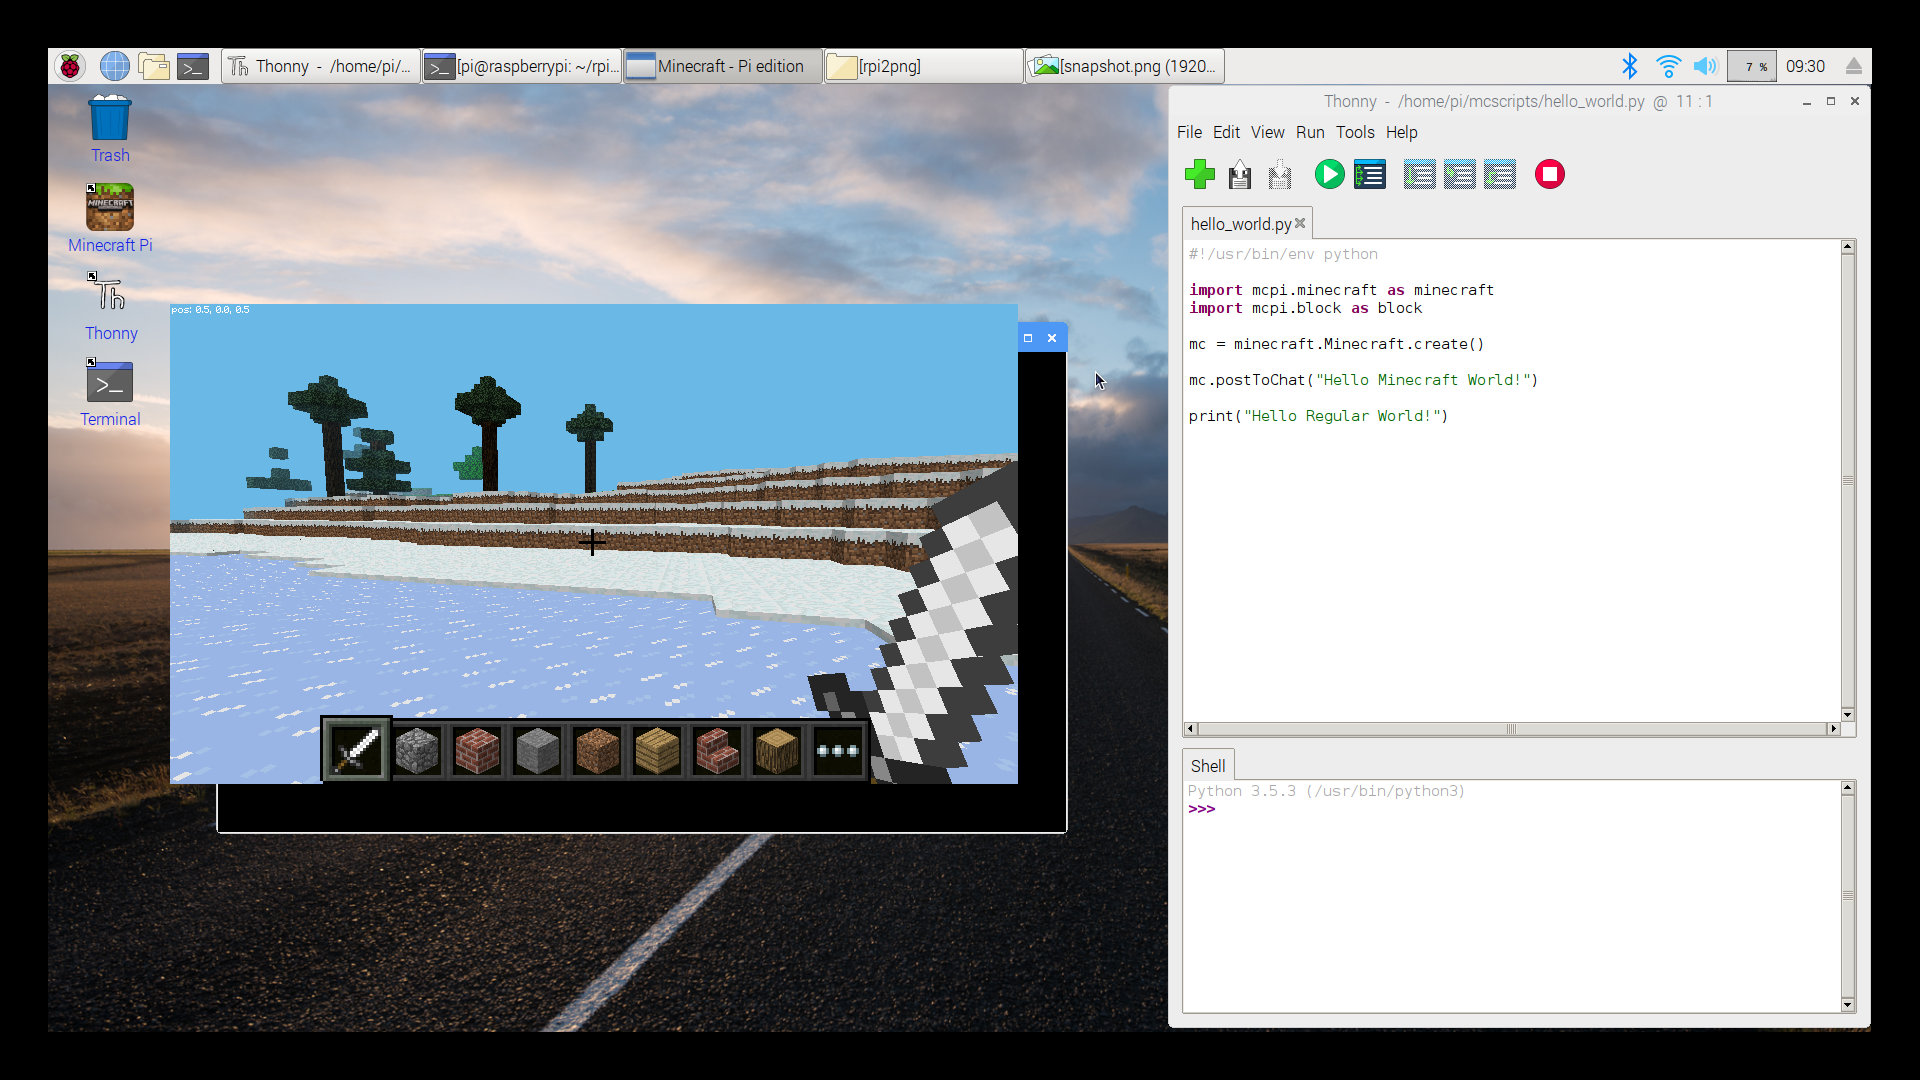
Let's go ahead and get started. Double-click on the "Thonny" icon and arrange the window as shown in the picture below. Double-click on "Minecraft Pi" icon, but don't change the window size. Not yet. There is a bug with the game that makes the mouse cursor wonky on the Select World screen if the window size has been changed. In the Minecraft window, click on [Start Game]. This will take you to the Select World screen. From here either select an existing world or create a new one. Your world will look different than mine, but you should be in the game, and moving the mouse will move your character's viewpoint.
|
Now that the game is open you can adjust the screen size if you want. First you will need to un-attach your mouse from the Minecraft game. To do this press the [Tab] key on your keyboard. Go ahead and try it. You can re-attach the mouse to Minecraft by clicking in the center of the Minecraft window. resizing the Minecraft window will take a little practice. You have to drag the edges of the terminal window underneath the Minecraft display.
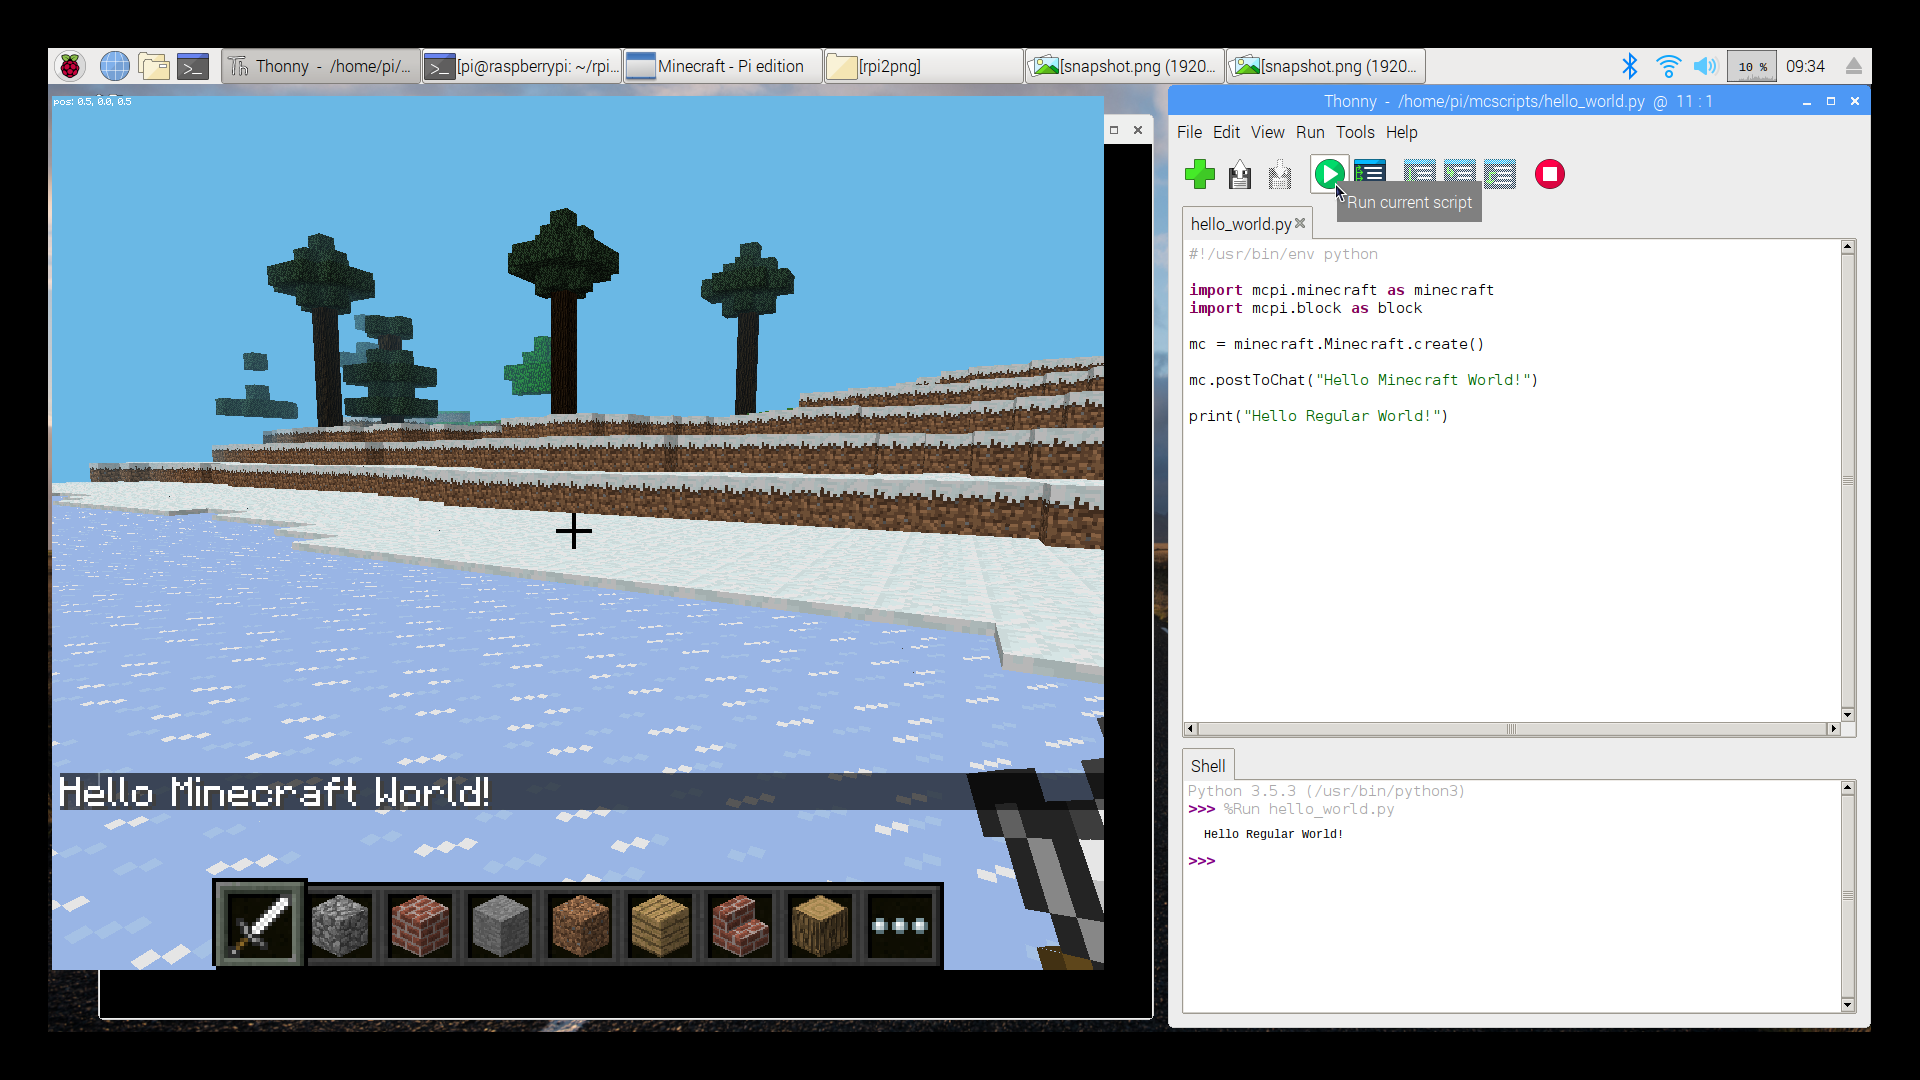
When Thonny opens for the first time there will be a Python script loaded called "hello_world.py". This script will take control of Minecraft and print a message in the Minecraft game. It will also print a message in the Thonny shell window. With the mouse un-attached go to the Thonny window and press on the [Run current script] icon that looks like a green play button with a sideways triangle. If everything is working properly you should see two hello world messages just like the picture below. This confirms that we have the ability to control Minecraft, and demonstrates the two ways that we will use to send messages to ourselves.
|
Let's take a second to look at the script and what it does. The hello_world.py script is shown below. We will look at each of the parts one at a time.
#!/usr/bin/env python3 import mcpi.minecraft as minecraft import mcpi.block as block mc = minecraft.Minecraft.create() mc.postToChat("Hello Minecraft World!") print("Hello Regular World!") |
The first line of the script is shown below. It is called the "Shebang". Technically this line isn't needed because we are using Thonny, however it is a good habit to include this line in all Python scripts. In the future if you decide to run the scripts without Thonny, this line lets Linux know which Python environment to run the script in. For now, just ignore it.
#!/usr/bin/env python3
|
The next part of the script is really important. These two lines import the libraries that we need to control Minecraft. The libraries exist on the computer in a folder called "mcpi" at the location "/usr/lib/python3/dist-Packages/". (Don't worry, you don't need to remember that because Thonny knows where it is). Inside that folder there are Python scripts called "minecraft.py" and "block.py". When we tell our script to "import mcpi.minecraft" we are really telling Thonny to go find the file "minecraft.py" inside the "mcpi" folder and give us the ability to use everything inside of it.
The second part of the import command where we say "as minecraft" is just a convenient way to create a name for the library file that we imported. In this example we left the name the same as the library file, but that isn't necessary. It can be called almost anything you want. For example, you could write "import mcpi.minecraft as blueberry" and that would work too. You would just have to remember to use the name blueberry to access the library in the future.
import mcpi.minecraft as minecraft import mcpi.block as block |
The next line is the one that makes the connection to the Minecraft game. For this to work, there has to be an open Minecraft game. When the connection is made the create() function inside the minecraft library returns a pointer to itself that we save to a variable called "mc". I know that probably sounds complicated, but all it really means is that now we can use the name "mc" to execute commands in the game. We don't need to worry about pointers and connections. All of that is taken care of automatically. By the way, the variable name "mc" can be changed if you want. You just have to remember to use the new name when executing commands.
mc = minecraft.Minecraft.create() |
Here is where we execute our first command. There are lots of commands available which we will get to later. For now. let's just post a chat message to the game. We do that by using the library's "postToChat" command by typing "mc.postToChat()". In Python the period "." (also called the dot operator) is used to access elements inside of something. In this case we are accessing the postToChat command inisde of the library that we connected to our game, which we called "mc". The message that you put inside the parenthesis can be any text string that you want. To tell Python that something is a text string the message is placed inside of quotes "". In fact, give this a try. Change the message to "I like lobsters!" or anything else and run the script again. Now you're coding!
mc.postToChat("Hello Minecraft World!") |
The last part of our first script is called a "print()" statement. It doesn't have an "mc" in front of it because it is part of Python, not part of Minecraft. Any message that you put in the print statement will show up in the Shell window at the bottom of the Thonny window. This is a great way to send yourself messages about what happens in Minecraft to someplace outside of Minecraft.
print("Hello Regular World!") |
Those are the basics. At this point you should have the ability to connect to Minecraft and send messages to it using Thonny to execute Python scripts.
Teleportation
Now let's do something a little more exciting. Let's try teleporting the player upwards into the sky and see what happens.
In the Thonny window, click the [Open...] icon. It looks like a floppy disk with an arrow pointing upwards (floppy disks are from a time before you were born). In the Open window that appears navigate to the /home/pi/mcscripts directory and open the file called "teleport.py". We will execute the script in a second.
Now is probably a good time to tell you something about the organization of your new computer. Your username is the default username for all raspberry pi computers, which is just "pi". The personal files of all users on a Linux computer are located in a folder called "/home". Therefore, all of your files are located at "/home/pi". I created a folder in your home directory called "mcscripts" (short for minecraft scripts). You shouldn't need to know this yet, but just in case, your password is the default password for all raspberry pi computers, which is "raspberry". Using the defaults isn't very secure so don't put personal information on this computer. If you decide to start using it for something other than hacking minecraft, let me know and we can make it more secure.
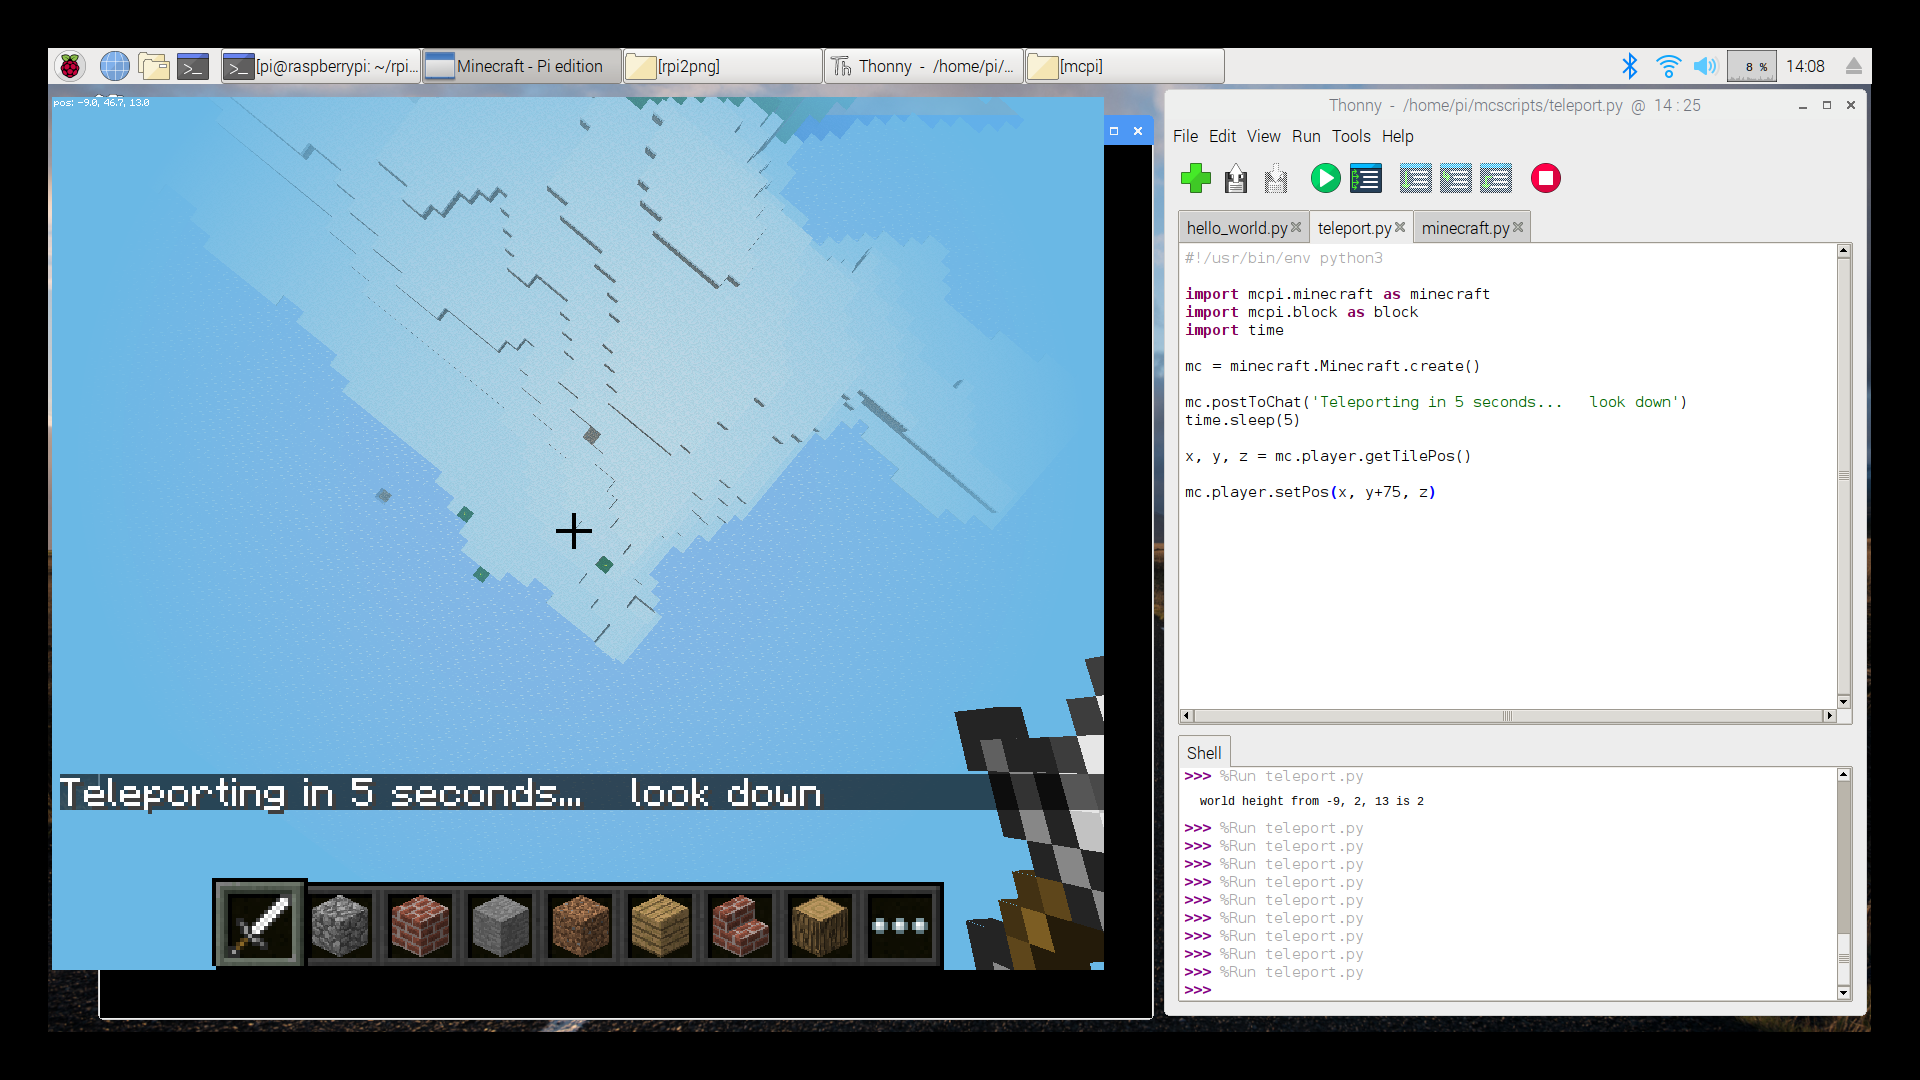
Back in the Thonny window, execute the "teleport.py" script, and then go back and click in the Minecraft window and look down. In 5 seconds the player will be teleported 75 blocks into the air. That's so high that initially you won't even be able to see the ground. And then... aaaaaaaaaaahhhhh... you should start falling back to the ground.
|
Let's take a look at the script that makes this happen. The teleport.py script is shown below. We will look at each of the new parts one at a time. I will skip parts that are exactly the same as the previous script.
#!/usr/bin/env python3 import mcpi.minecraft as minecraft import mcpi.block as block import time mc = minecraft.Minecraft.create() mc.postToChat('Teleporting in 5 seconds... look down') time.sleep(5) x, y, z = mc.player.getTilePos() print("x={}, y={}, z={}" .format(x, y, z)) mc.player.setPos(x, y+75, z) |
There is a new library imported in this script called "time". This import command is simpler than the others because the time library is already part of Python, so there is no need to tell Python to find specific folders or files. Python already knows where to find these libraries. Notice that in this case I decided not to rename the time library using "as" because the name is already simple. The reason that the time library is imported is so that we can use the library's sleep() command. There are tons of standard libraries for Python like the time library, and tons of non-standard libraries like the one for minecraft. If you decide that programming is something that you like, Python is a great programming language to learn. You can do a lot with it.
|
import time
|
In order to call the sleep command we use the dot notation which says, call the "sleep" function inside of the "time" library. If you look at the definition for the sleep() command using this link, you will see that the value passed inside the parenthesis is the amount of time to go to sleep in seconds. This means that if we execute "time.sleep(5)" the program will go to sleep when it executes this command, and will wake up 5 seconds later, and will start executing the program again. For this script, the delay allows enough time for you to click back into the Minecraft window and look down. It's a lot more exciting when you're falling from the sky if you are looking down.
|
time.sleep(5)
|
In the next command we introduce a function called "getTilePos()" which returns the position of the tile that the player is standing on. I like using this better than "getPos()" command which returns the player's position because tiles are always on nice integer numbers like 1, 2, 3... but the player can move in small increments on top of a tile so that position may be 1.233, 1.234, 1.235...
The getTilePos() command is two levels deep inside the library, so in order to call it, we use the command "mc.player.getTilePos()". That command returns a vector of three values representing the 3-dimensional position in a rectangular (x, y, z) coordinate system. If the result was assigned to a single variable, like "v", then printing "v" would result in a value of "Vec3(-9,2,13)". The good news is that Python is an adaptive language that will transform the results to something else, if it can understand what you are looking for. For example, in the script the result is assigned to three variables "x, y, z = mc.player.getTilePos()". Python will understand that what you want is to assign the 1st value to x, the 2nd value to y, and the 3rd value to z, and it will do that.
|
x, y, z = mc.player.getTilePos()
|
I added a print command to demonstrate an important printing feature, and to show that Python assigned individual values to x, y, and z above. In the previous script we simply printed a text message. A very useful ability is to return messages with real values. The way we do that in Python3 is with curly brakets {} inside the text message and the .format() command. There must be a curly bracket for each value that is passed to the .format() command. In this example we pass three values in .format(x, y, z), and there are three brackets in the text string "x={}, y={}, z={}". When this is executed, the values of x, y, and z will replace the brackets and the printed result will look something like "x=-9, y=2, z=13".
|
print("x={}, y={}, z={}" .format(x, y, z))
|
Finally, the part that makes the magic happen is the "setPos()" command. This command sets the player's position to the value that we provide. This command takes three values (x, y, z) which define a point in space where the player will be sent. The y value defines positions that are "up" and "down". Since we captured the player's current position, we can move the player relative to that position. Sending the player to a location of "mc.player.setPos(x, y+75, z)" teleports the player 75 blocks directly upwards from their current position.
|
mc.player.setPos(x, y+75, z)
|
The image below is a nice representation of the Minecraft coordinate system. The x and z values represent movement along the ground, and the y value represents "up" and "down". Notice that I did NOT say that x was "forward" or "backward" or that z was "left" or "right". The reason is that those words mean something based on the way the player is facing. For example, if you moved the mouse to face something like a tree, and pressed the [w] key, you would say that you are moving "foward" towards the tree. But that is probably not exactly in the x or z direction.

|
This image was appreciateively borrowed from Wikimedia commons. Click on image for attributes and licensing. |
The good news is that unlike the player, the world of Minecraft is very constant, and you can rely on the axis system to always be the same, no matter which way the player is facing. This fact will be very useful when we start building stuff!
The Coordinate System
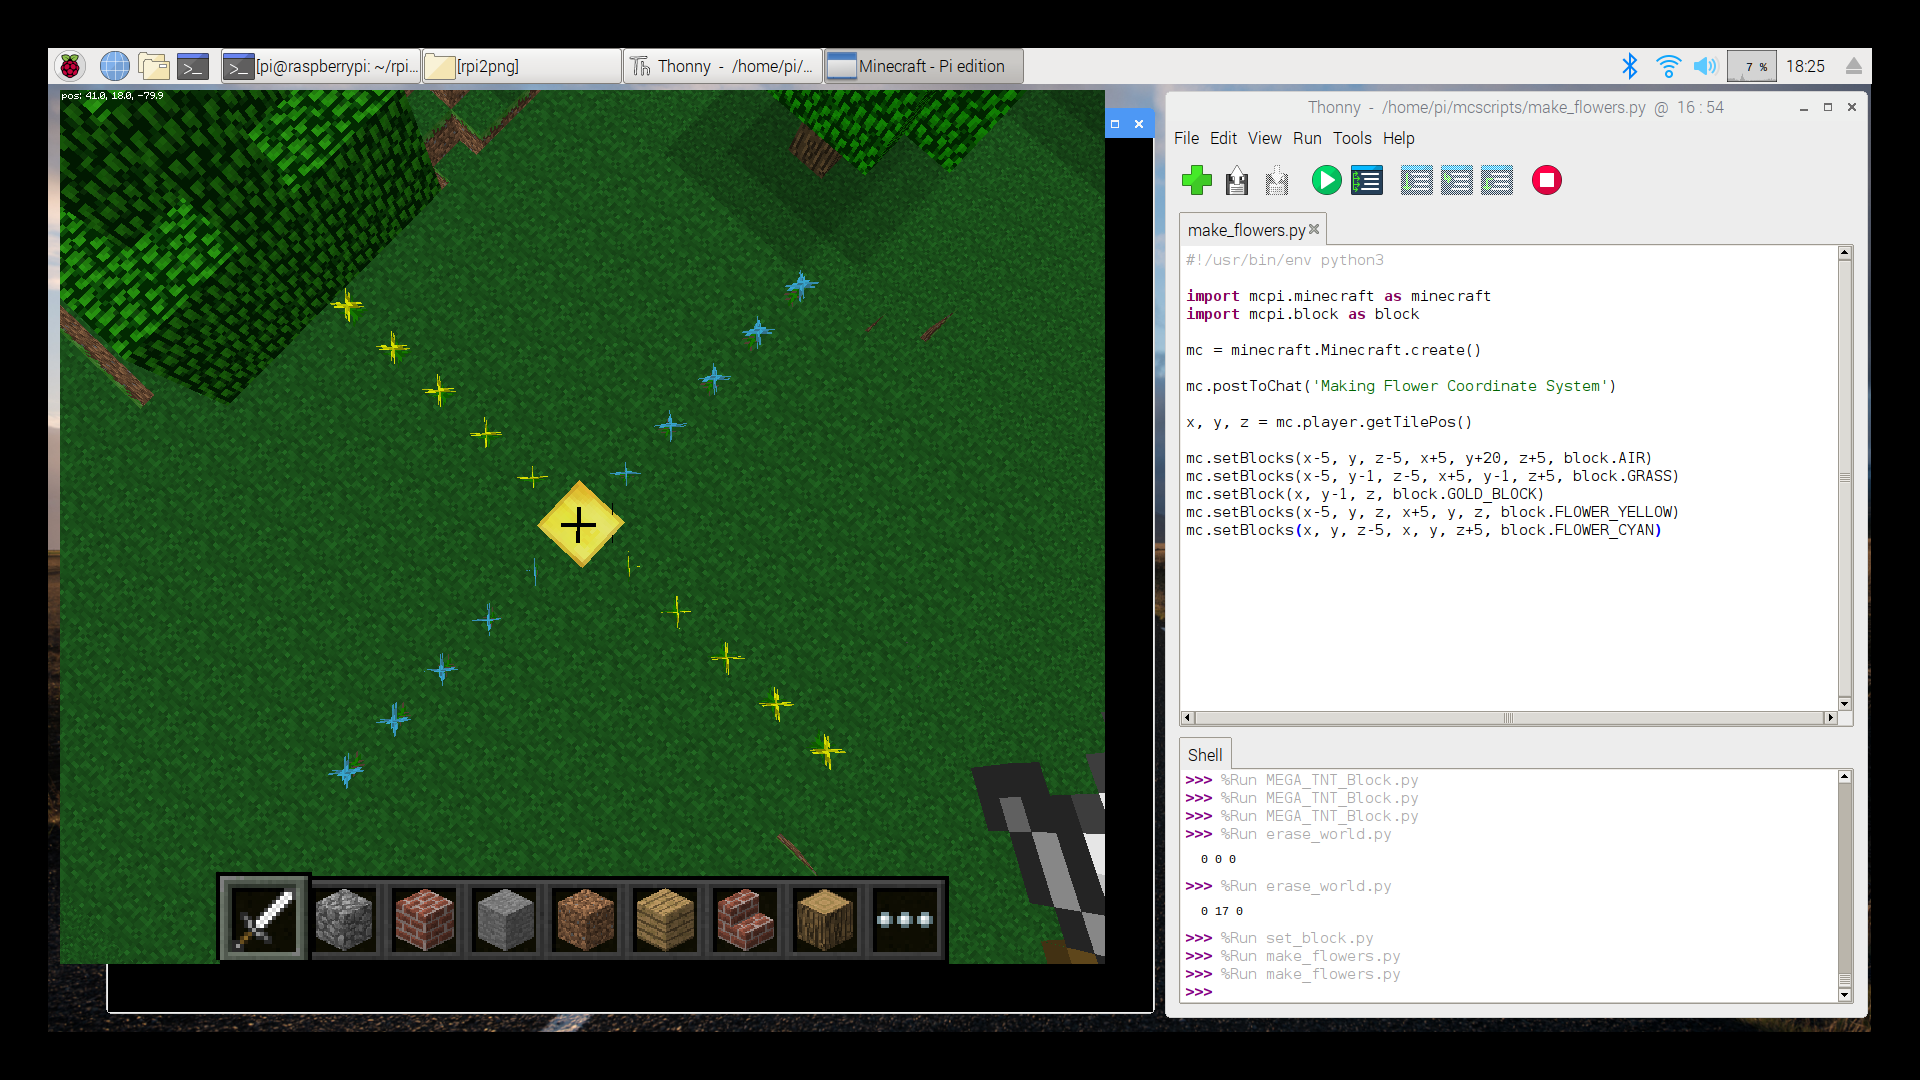
Before we start building things, let's make sure that we understand the coordinate system. Inside the Minecraft game walk the player to a position where you would like to plant a flower garden. Select the [Tab] key to un-attach from Minecraft. In the Thonny window, click the [Open...] icon, open the file called "make_flowers.py", and execute the script. There is no delay so you should immediately see an area that is 10 by 10 spaces turn into a grass field, with yellows flowers on the x-axis, blue flowers on the z-axis, and a gold block in the center. It is best to see from above. You probably already know this, but double-click on the space bar to fly, and hold the space bar to go up. What you see should look like the picture below.
|
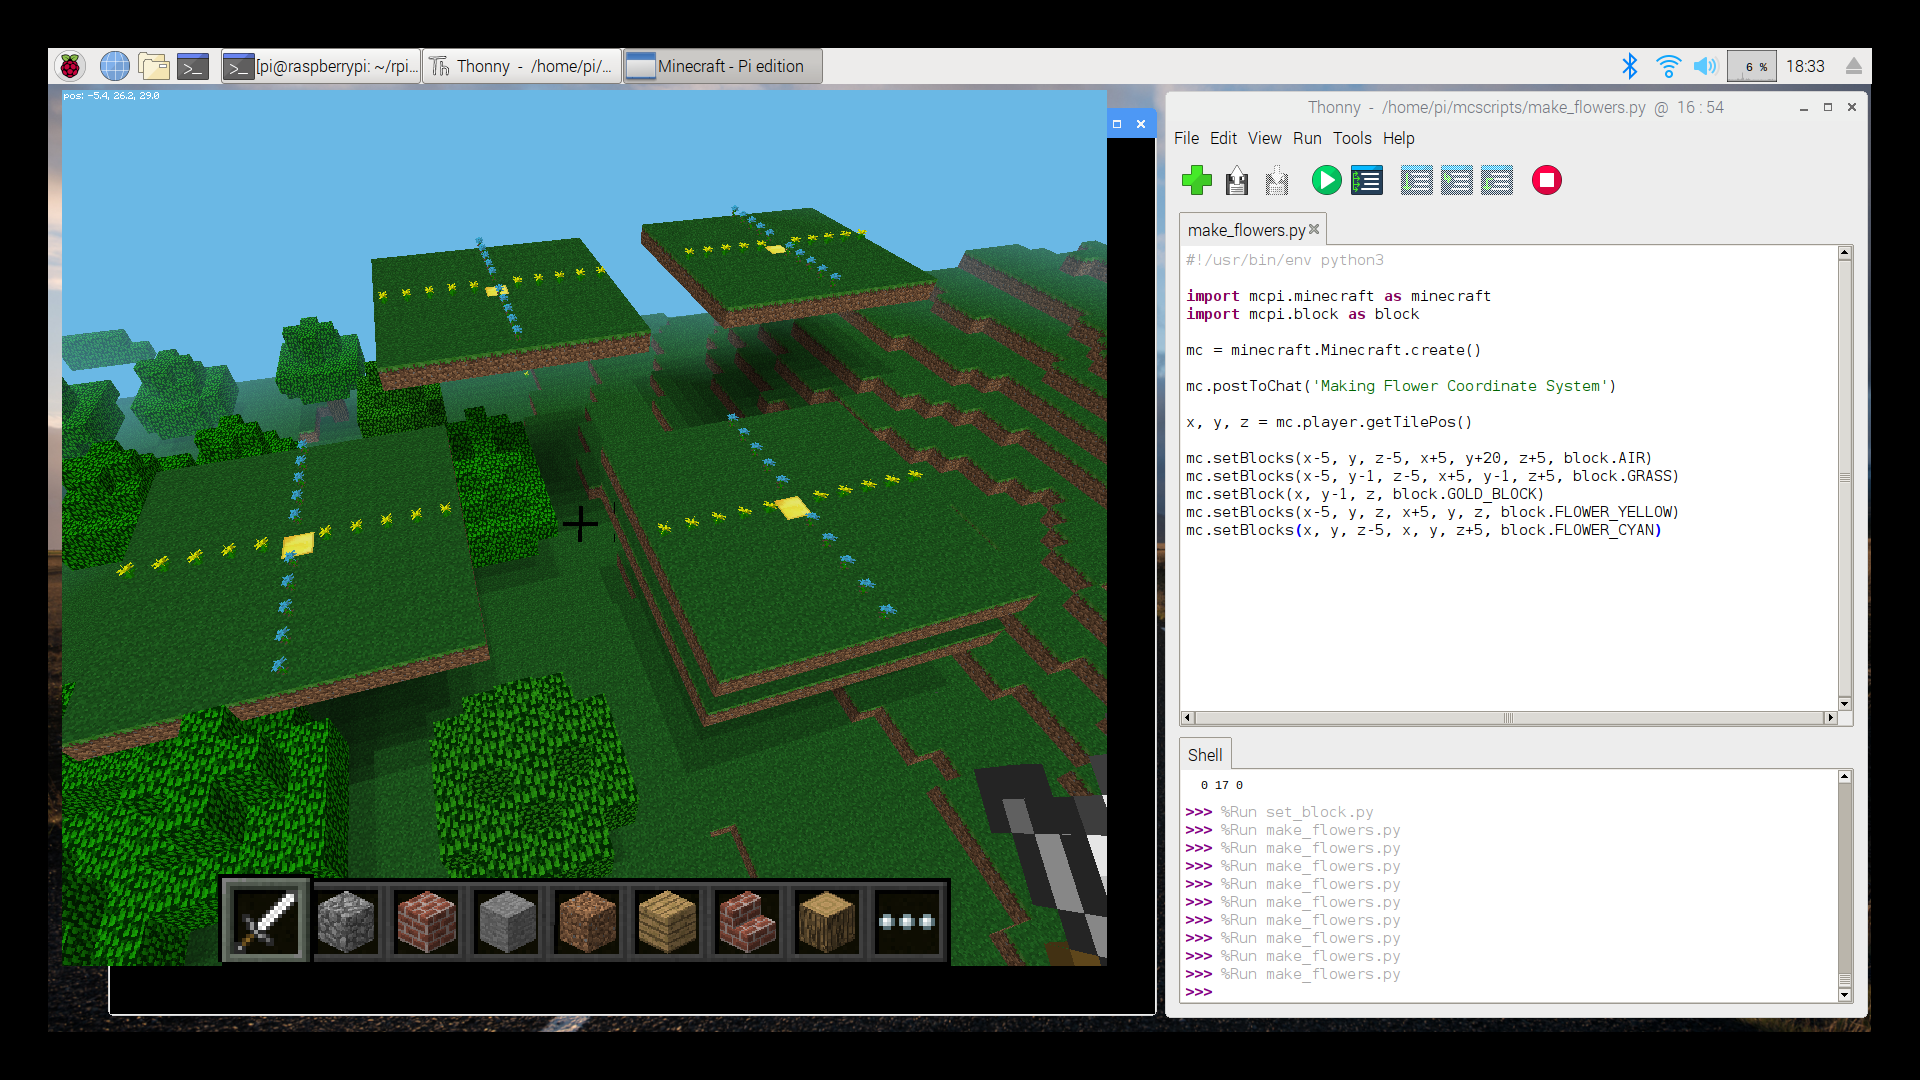
Try executing the script in several locations. At each location try turning the player so that he is looking in different directions. After making a few flower gardens, fly upwards and take a look at them. They should look like the picture below. Notice that in all of the flower gardens the yellow flowers and blue flowers are always aligned in the same direction, even though the player was facing different directions. This shows that the coordinate system of the Minecraft world is always fixed, and doesn't change based on the direction that the player is facing.
|
Let's take a look at how the script makes the garden. The make_flowers.py script is shown below. This script adds a really important ability. In particular, we can change blocks! We can change blocks that exist from one type to another type, and since "AIR" is type of block, we can even create blocks out of thin air! It's like magic.
#!/usr/bin/env python3 import mcpi.minecraft as minecraft import mcpi.block as block mc = minecraft.Minecraft.create() mc.postToChat('Making Flower Coordinate System') x, y, z = mc.player.getTilePos() mc.setBlocks(x-5, y, z-5, x+5, y+20, z+5, block.AIR) mc.setBlocks(x-5, y-1, z-5, x+5, y-1, z+5, block.GRASS) mc.setBlock(x, y-1, z, block.GOLD_BLOCK) mc.setBlocks(x-5, y, z, x+5, y, z, block.FLOWER_YELLOW) mc.setBlocks(x, y, z-5, x, y, z+5, block.FLOWER_CYAN) |
There are two new commands in this script. The first is "setBlocks", which changes multiple blocks at once. The second is "setBlock", which changes just one block. The second one is the simplest, so let's talk about that first. The "setBlock" command takes 4 input values (x,y,z,id). The values of "x, y, z" define the location of the block, and the "id" value defines the type of block to turn it into. In this case we set the id to "block.GOLD_BLOCK". Previously in the script we used "getTilePos()" to get the values of x, y, z of the position of the block that the player was standing "in". By passing x, y-1, z to "setBlock()" we will change the block that the player is standing "on".
|
mc.setBlock(x, y-1, z, block.GOLD_BLOCK)
|
The "setBlocks()" command takes 7 input values (x1,y1,z1,x2,y2,z2,id). This command will change all of the blocks between the points (x1,y1,z1) and (x2,y2,z2) into the type of block defined by the "id" value. Depending on the difference between the x, y, and z values, this could change a line of blocks (1-dimension), a plane of blocks (2-dimensions), or a cube of blocks (3-dimensions). Looking at the code below that creates the grass, the x and z values are modified by -5 and +5. This changes a 2-dimensional flat space.
Look at one of the pictures above of the gardens and imagine the player standing on the gold block facing the line of blue flowers. With the player standing like that, the value of (x1,y1,z1) of (x-5,y-1,z-5) would be like the player moving to the left 5 paces, and moving backwards 5 paces. Starting back on the gold block again, the value of (x2,y2,z2) of (x+5,y-1,z+5) would be like the player moving to the right 5 paces, and moving forwards 5 paces. The "setBlocks()" command changes all of the blocks in a square shape between the first point and the second point. Because y-1 is used in both places, the blocks 1 space below the player will be changed.
|
mc.setBlocks(x-5, y-1, z-5, x+5, y-1, z+5, block.GRASS)
|
One of the commands turns a bunch of blocks into AIR which may seem a little confusing, but this turns out to be a powerful tool. Turning blocks into AIR is like being able to erase. This is nice if you want to start building on a clean looking piece of property. It is also a great way to make holes in walls for doors and windows.
One way to be able to see how this works is to execute the script while standing under a tree, or while standing next to a hill, or even better try digging down into the ground first. Give it a try and see how it works. Another interesting way to see how creating the garden works is also to fly up in the air and create a garden in the sky. Don't forget that AIR is a block too and can be changed into anything you want. Don't let the laws of Physics stop you from building anything you want anywhere you want.
|
mc.setBlocks(x-5, y, z-5, x+5, y+20, z+5, block.AIR)
|
The Standard List of Blocks
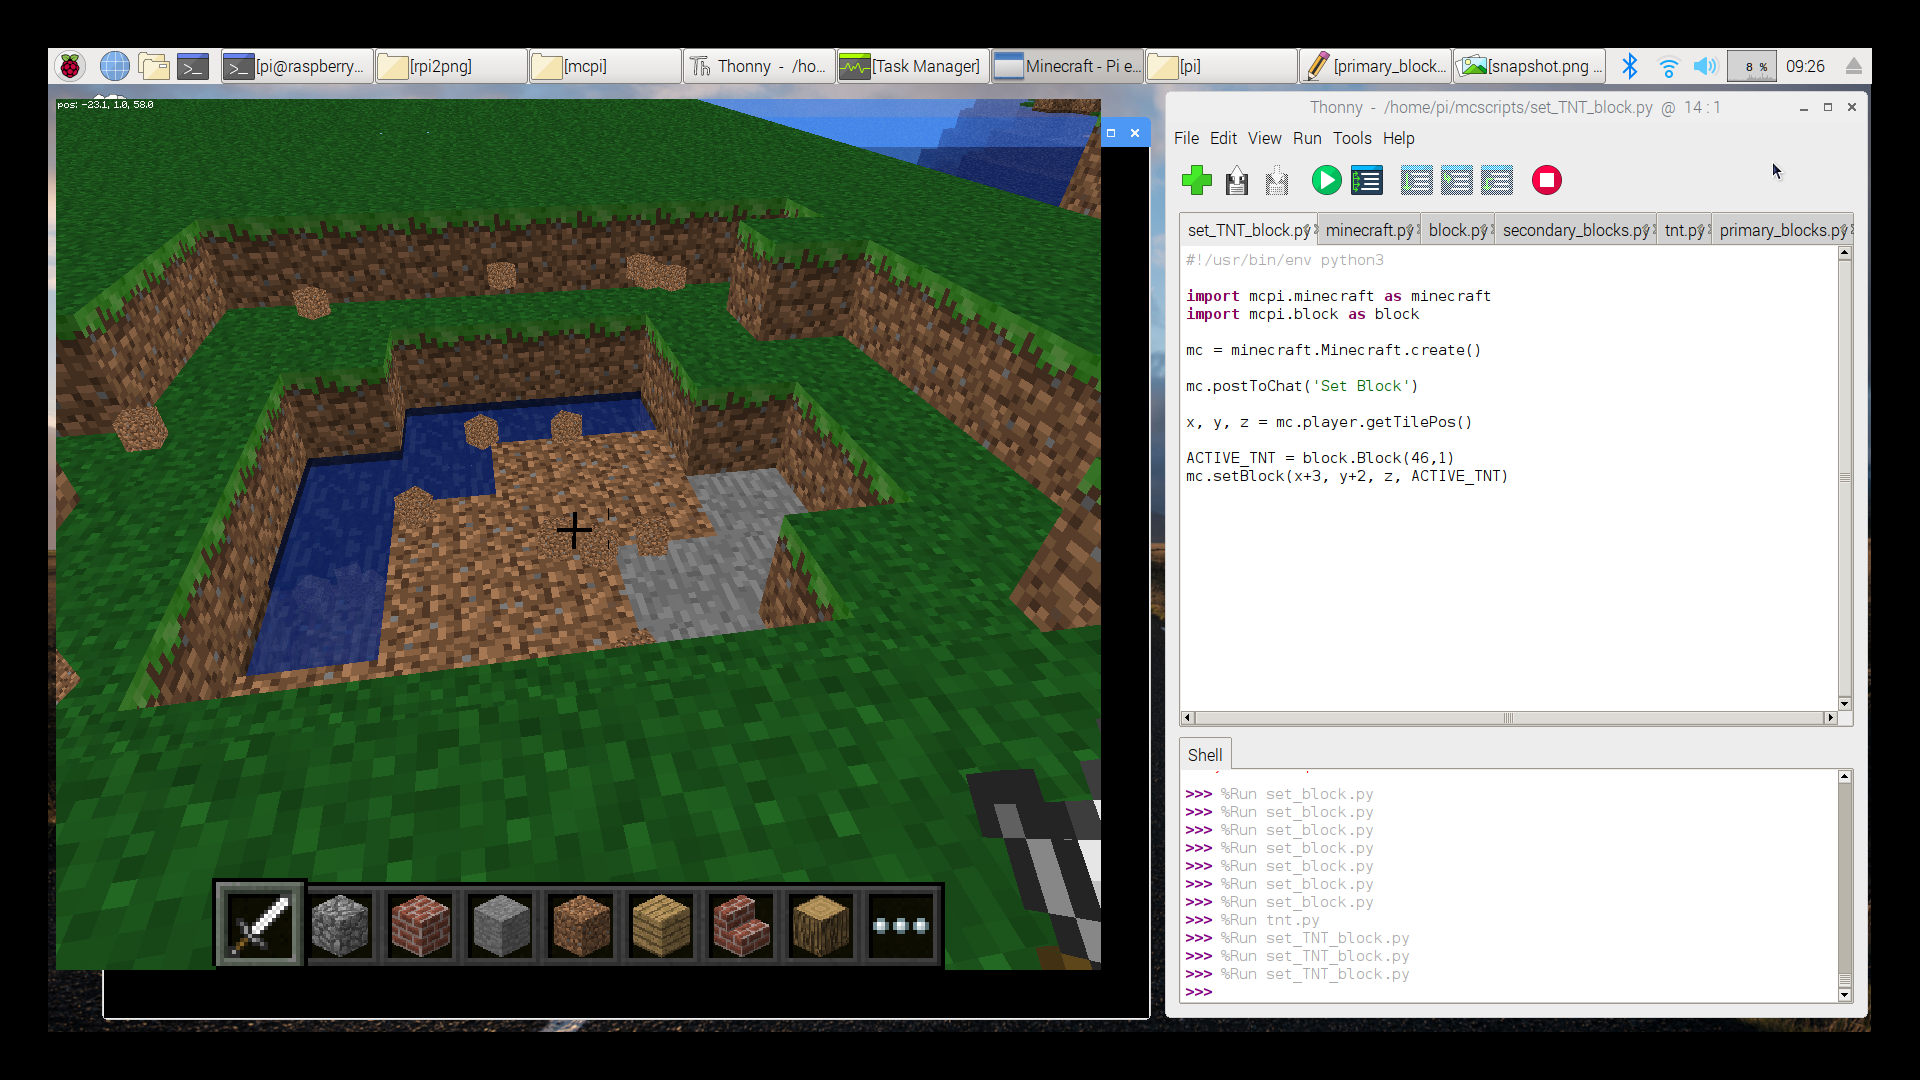
In the script above we used a few different blocks, but there are many more available. This is a great time to explore what some of these blocks are. Go back to Thonny and open a script called set_block.py. It should look like the script shown below. This is just a simple script that gets the player's current position, and places one block 3 spaces away and 2 spaces up from the player. The first time you run the script you'll probably have to go back to Minecraft and look around with the mouse to see where it placed the block. Then go back to Thonny and change the type of block in the mc.setBlock() command, and run the script again.
#!/usr/bin/env python3 import mcpi.minecraft as minecraft import mcpi.block as block mc = minecraft.Minecraft.create() mc.postToChat('Set Block') x, y, z = mc.player.getTilePos() mc.setBlock(x+3, y+2, z, block.GRASS) |
You're probably thinking, what should I change it to? The list below contains all of the blocks that are defined in the "blocks.py" library. In order to change any block into one of these blocks, set the "id" value passed to the "setBlock()" or "setBlocks()" command to equal one of the definitions below. To use the definitions, use the dot notation. For example: block.AIR, or block.STONE, or block.GRASS, and so on.
Play around with this for a while. You may notice that some blocks will stay in the air, some will fall, others will flow. If you feel adventurous, try changing the script. perhaps add another setBlock() command to place two different blocks side-by-side. Or try using the setBlocks() function to create a wall of blocks. If you do make changes, save your scripts under a different name. You can do that using [File] --> [Save as] in Thonny.
AIR = Block(0) STONE = Block(1) GRASS = Block(2) DIRT = Block(3) COBBLESTONE = Block(4) WOOD_PLANKS = Block(5) SAPLING = Block(6) BEDROCK = Block(7) WATER_FLOWING = Block(8) WATER = WATER_FLOWING WATER_STATIONARY = Block(9) LAVA_FLOWING = Block(10) LAVA = LAVA_FLOWING LAVA_STATIONARY = Block(11) SAND = Block(12) GRAVEL = Block(13) GOLD_ORE = Block(14) IRON_ORE = Block(15) COAL_ORE = Block(16) WOOD = Block(17) LEAVES = Block(18) GLASS = Block(20) LAPIS_LAZULI_ORE = Block(21) LAPIS_LAZULI_BLOCK = Block(22) SANDSTONE = Block(24) BED = Block(26) COBWEB = Block(30) GRASS_TALL = Block(31) WOOL = Block(35) FLOWER_YELLOW = Block(37) FLOWER_CYAN = Block(38) MUSHROOM_BROWN = Block(39) MUSHROOM_RED = Block(40) GOLD_BLOCK = Block(41) IRON_BLOCK = Block(42) STONE_SLAB_DOUBLE = Block(43) STONE_SLAB = Block(44) BRICK_BLOCK = Block(45) TNT = Block(46) BOOKSHELF = Block(47) MOSS_STONE = Block(48) OBSIDIAN = Block(49) TORCH = Block(50) FIRE = Block(51) STAIRS_WOOD = Block(53) CHEST = Block(54) DIAMOND_ORE = Block(56) DIAMOND_BLOCK = Block(57) CRAFTING_TABLE = Block(58) FARMLAND = Block(60) FURNACE_INACTIVE = Block(61) FURNACE_ACTIVE = Block(62) DOOR_WOOD = Block(64) LADDER = Block(65) STAIRS_COBBLESTONE = Block(67) DOOR_IRON = Block(71) REDSTONE_ORE = Block(73) SNOW = Block(78) ICE = Block(79) SNOW_BLOCK = Block(80) CACTUS = Block(81) CLAY = Block(82) SUGAR_CANE = Block(83) FENCE = Block(85) GLOWSTONE_BLOCK = Block(89) BEDROCK_INVISIBLE = Block(95) STONE_BRICK = Block(98) GLASS_PANE = Block(102) MELON = Block(103) FENCE_GATE = Block(107) GLOWING_OBSIDIAN = Block(246) NETHER_REACTOR_CORE = Block(247) |
A Tower of TNT!
The first time I read through the list of blocks and saw TNT, I thought to myself, I definitely need to try that one. But when I placed it into Minecraft nothing happened. I hit it, tried to set it on fire, placed it on top of LAVA. Nothing happened! Grrr. Why have TNT if it doesn't do anything? ...and then I found the answer.
It turns out that the Block function takes 2 values Block(id, data), and if the data value isn't provided the library sets it to a default value of zero. That means that when we use the library's value of block.TNT it is the same as using Block(46,0). That gives you "inactive" TNT. booooring! Setting the data value to 1 however gives you "active" TNT. Much better!
To use the Block command ourselves, we call it using the block library like this: "block.Block(id, data). Try this. Open the "set_block.py" script again, and add the definition shown below for ACTIVE_TNT. Then, modify the mc.setBlock() command to use your ACTIVE_TNT definition. That's right, you just defined your own block! Nice job!
ACTIVE_TNT = block.Block(46,1) mc.setBlock(x+3, y+2, z, ACTIVE_TNT) |
After running the script, go back to Minecraft and give the block of TNT a few whacks with your sword. Did it fall to the ground and start flashing yet? Yes? uh-oh. You may want to take a few steps backwards.
|
Pretty cool, huh? And that was just one block of TNT. Hmmm... Are you thinking what I'm thinking?
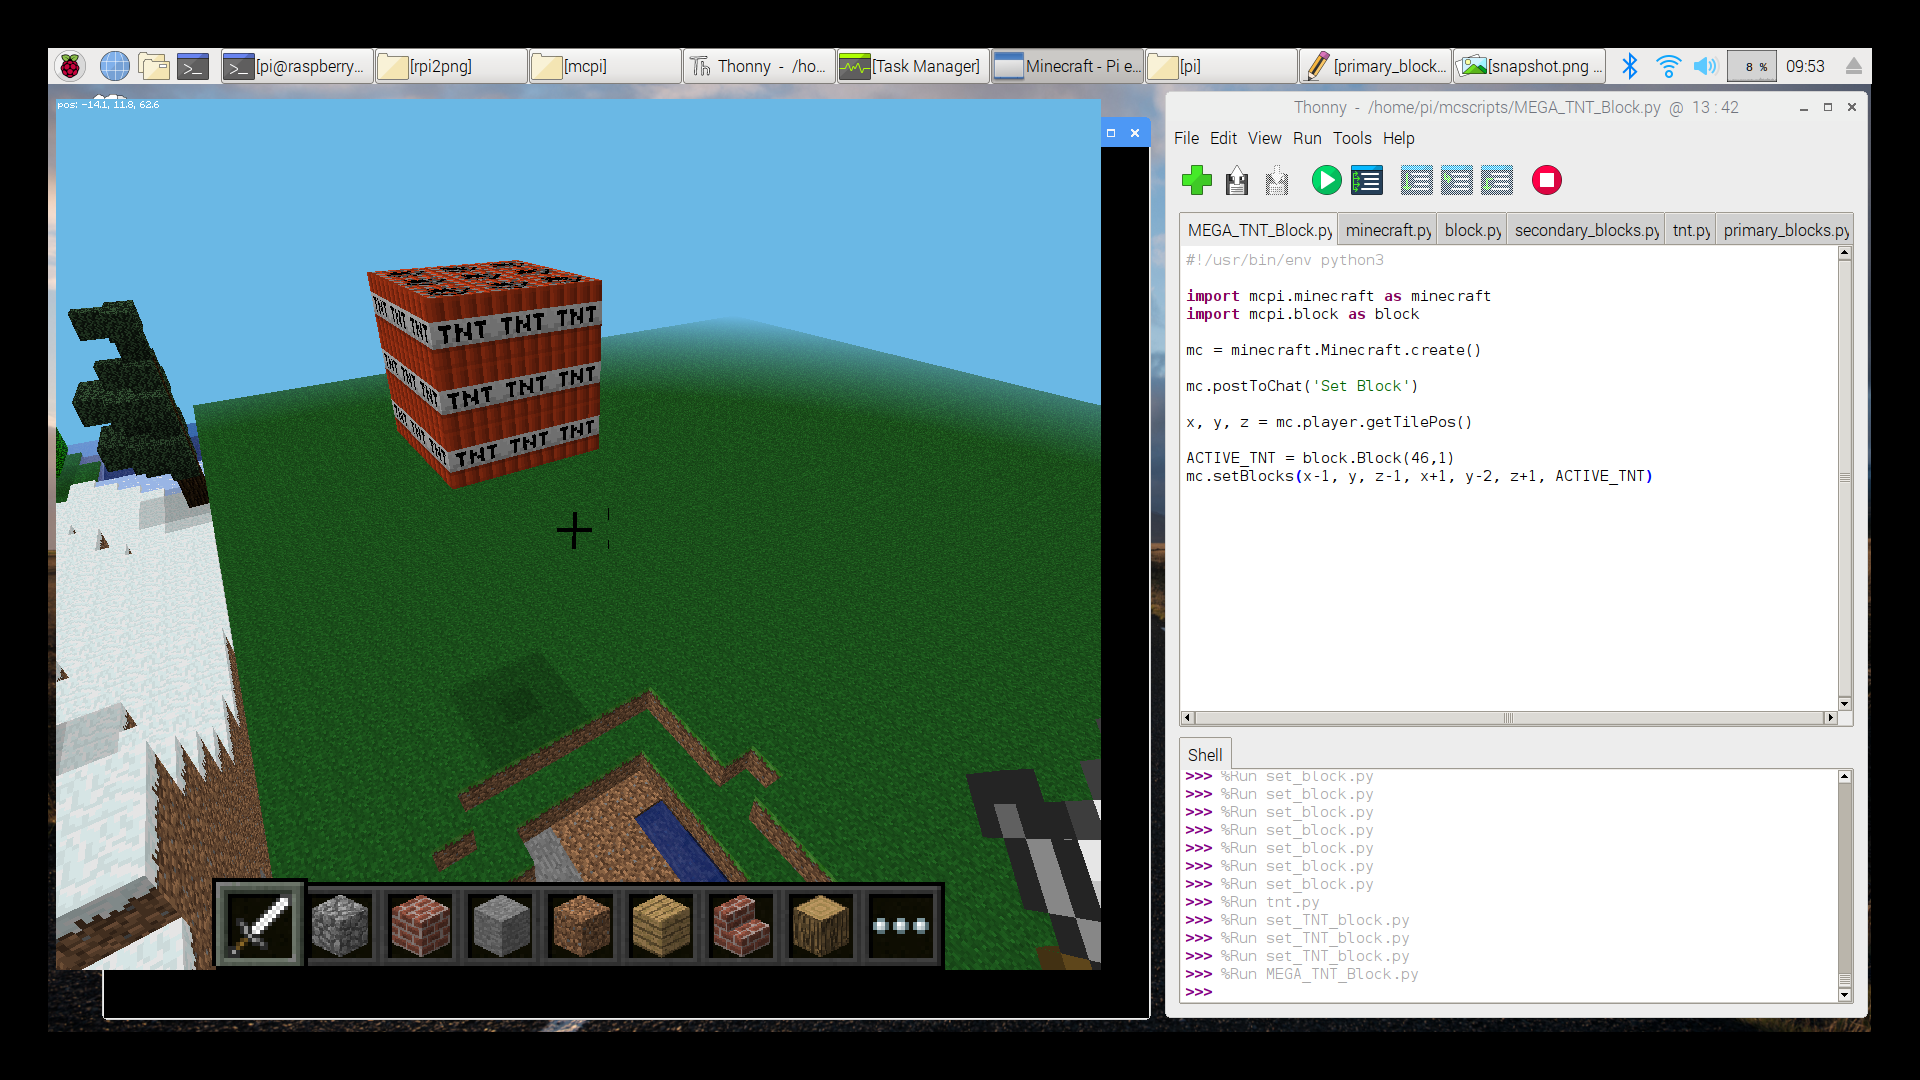
I'll assume the answer is yes. Let's make some more changes to the script. change the setBlock command into a setBlocks command using the values shown below. This will create a MegaBlock of TNT that is 3 by 3 by 3, and it will put it directly underneath wherever you are standing.
mc.setBlocks(x-1, y-1, z-1, x+1, y-2, z+1, ACTIVE_TNT) |
Before running this script, go back to the game first and fly up in the air a little. That way you will be able to see the entire block. Go back to Thonny and run the script, then go back to the game and look down. Yikes! Fly away from the block and you should see something like the picture below. Of course we can't just leave TNT lying around. That would be unsafe. You'll have to give it a few good whacks with the sword to get rid of it.
|
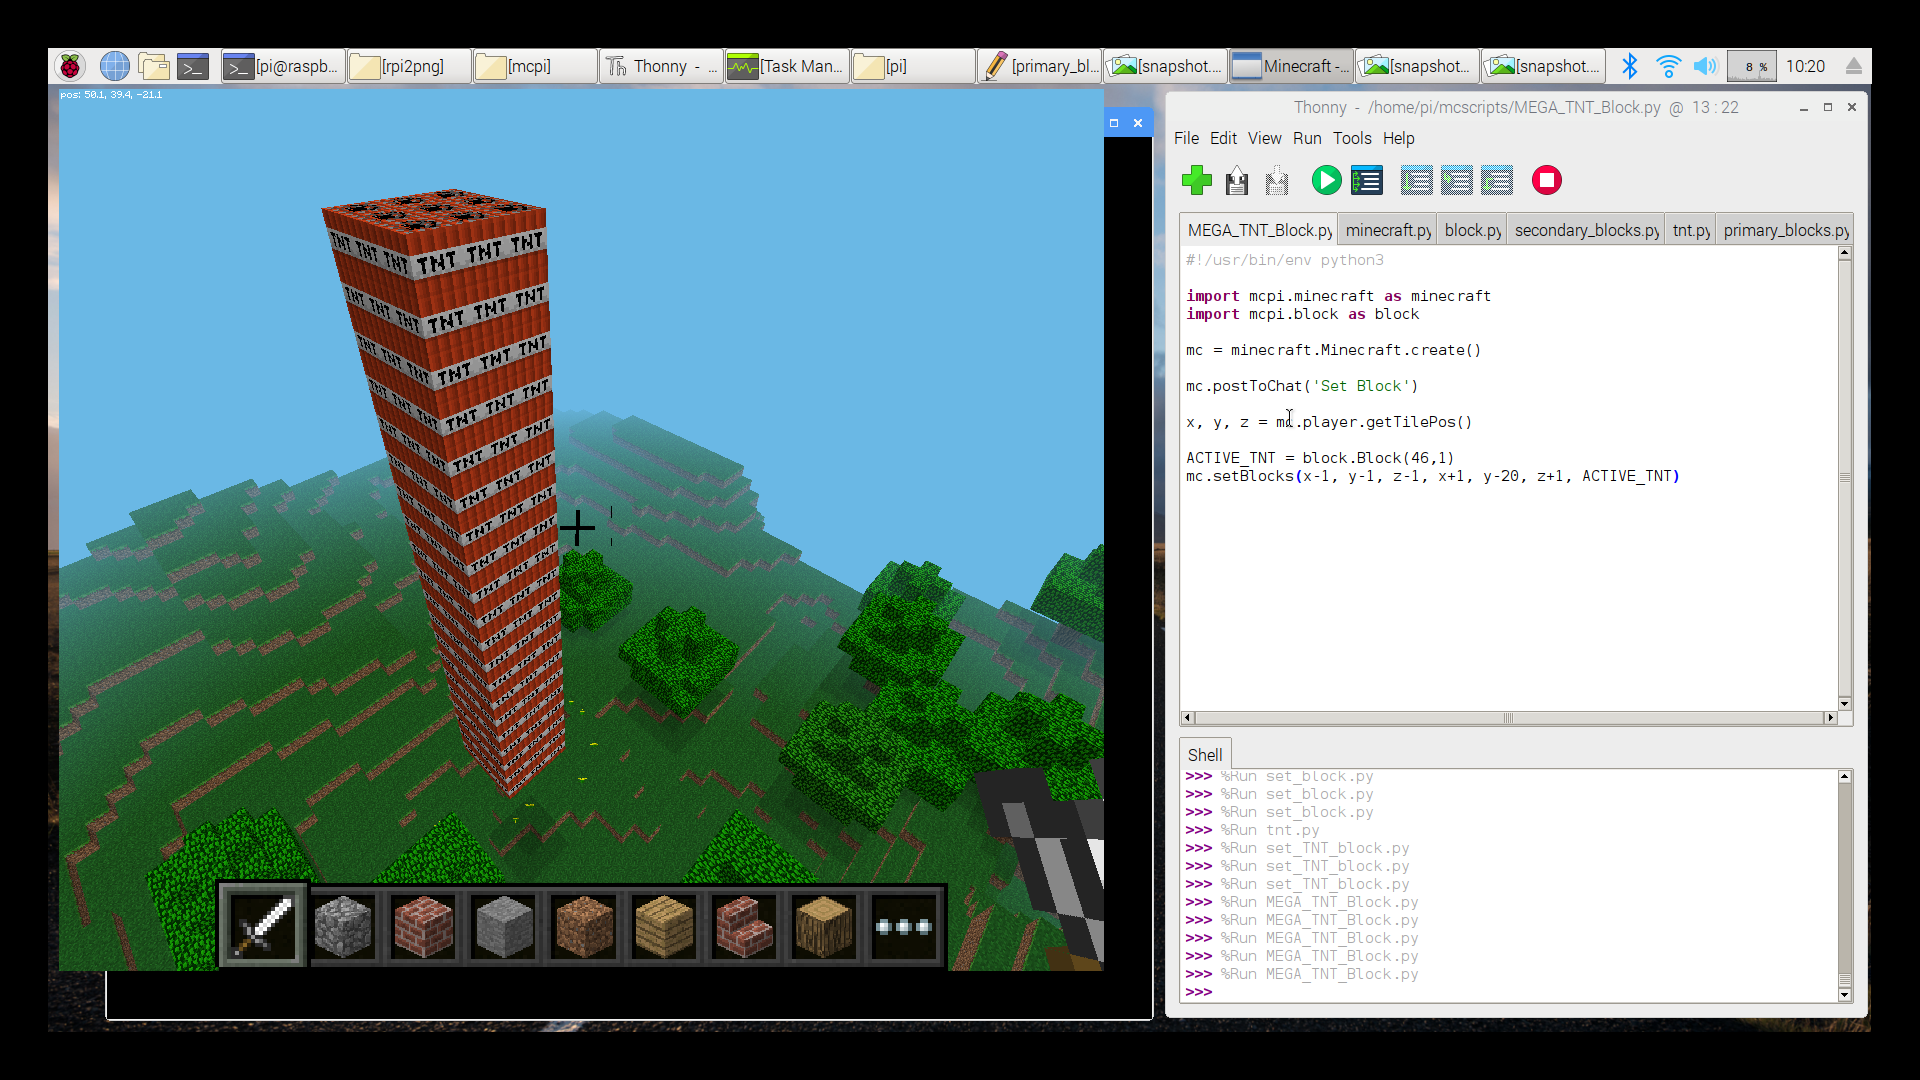
The name of this section was "Tower of TNT" and we aren't there yet. Let's make just one more change to the script. Change the "y-2" value to be something larger. Like "y-20" perhaps. This will create a Tower of TNT that is 3 by 3 by 20.
mc.setBlocks(x-1, y-1, z-1, x+1, y-20, z+1, ACTIVE_TNT) |
You may need to fly a little higher in the air this time. Does your tower look like this? Now that is downright scary looking! Go ahead. Give it a whack.
|
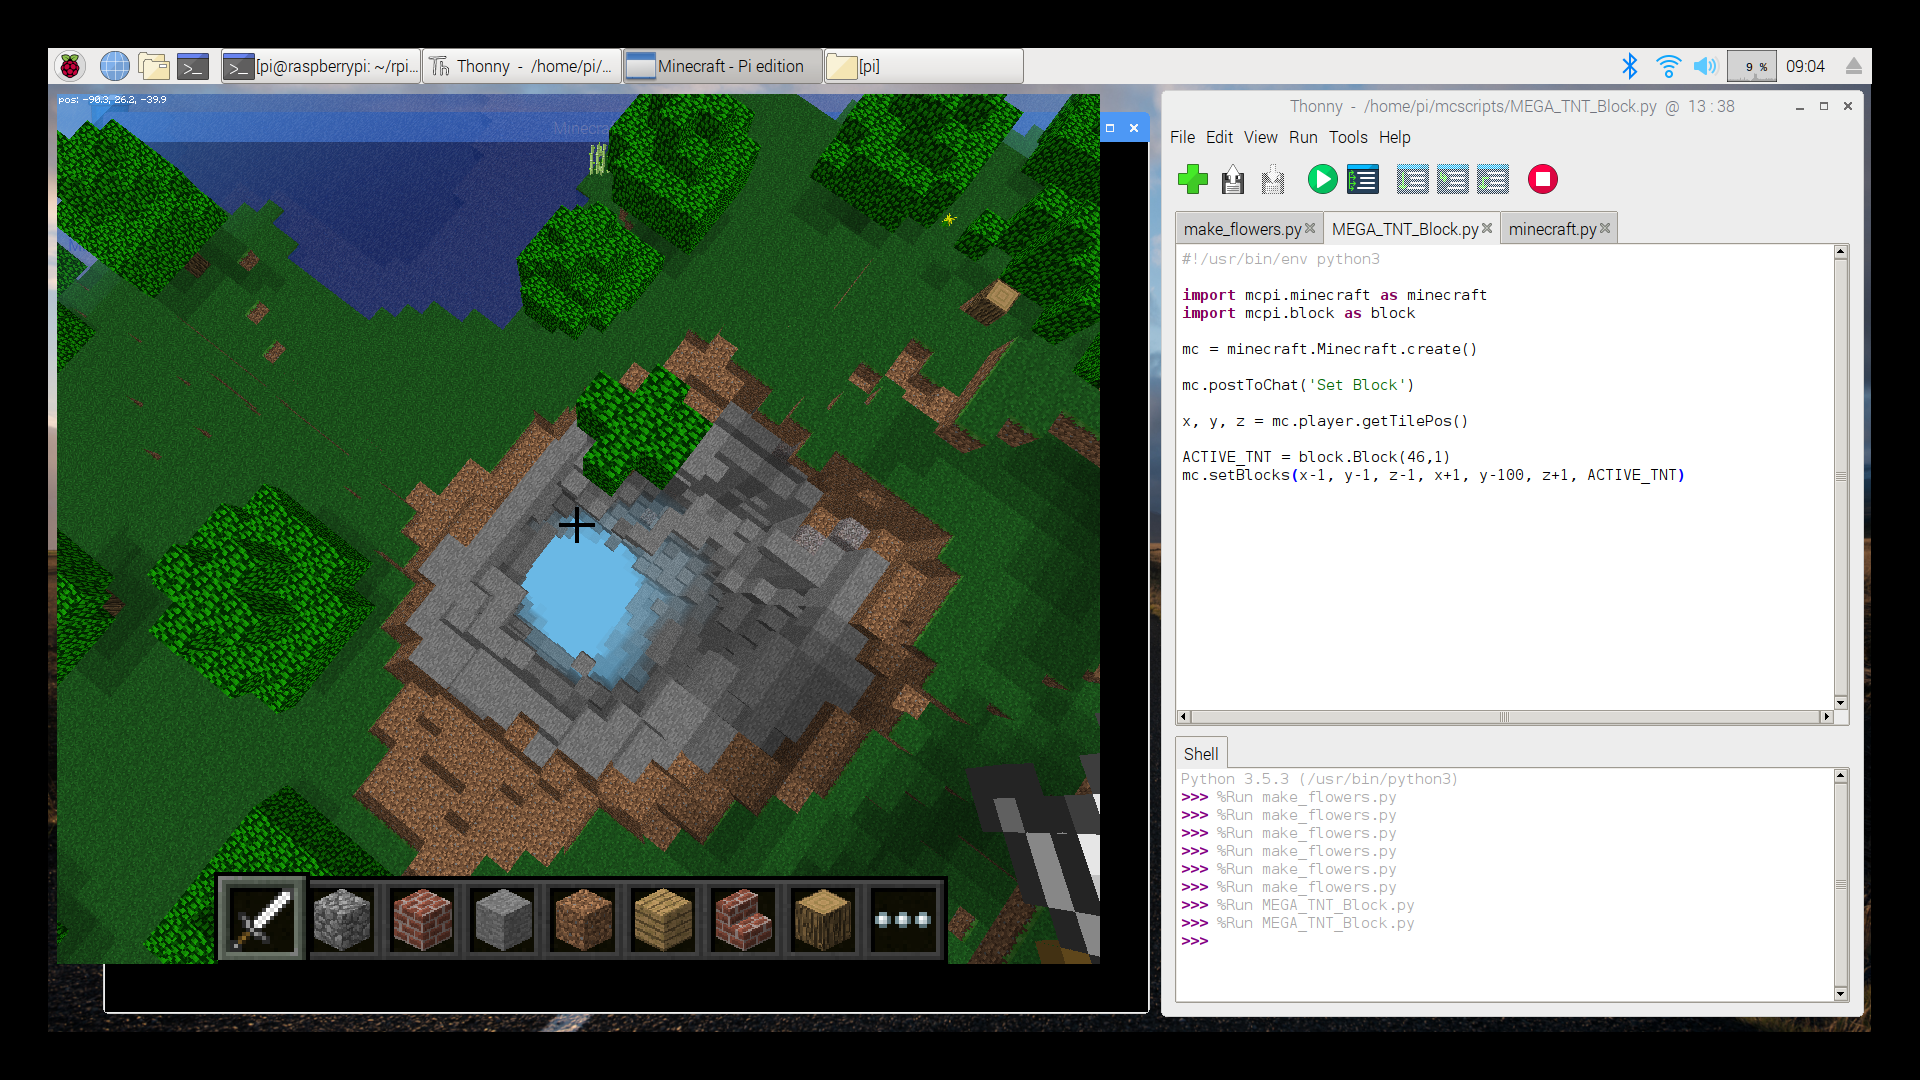
All of this is really fun, but there is also a lesson to be learned here. Everything has limits, and it is good to know what they are. Change the script again. Instead of y-20, this time use y-100. This time instead of flying in the air, stand on the ground before running the script. Give the top of the TNT a few whacks with the sword, and then fly up in the air to watch what happens. You should see something like the picture below. It should look like you blew a hole through the entire world.
|
Up until this point you may have noticed that there isn't any way to be harmed in Minecraft's creative world mode. There is one exception. If you double-click the spacebar, you will begin to fall into the hole that you just made. On the way down you may notice that the ground stops at y=-64. That is as far as the solid world goes. This is also the limit to how far down you can build. If you try to set a block below -64, the command will be ignored. If you continue falling, eventually you will die, and will have to respawn or restart. If you are fast, you can double-click the space bar again and stop before dying. The final limit of the world is at -128.
The sides of the world are also limited to 128 blocks in each direction. Although you won't die there, you just can't move or build farther than that. The x direction goes from -128 to +128, and the z direction goes from -128 to +128. The y-direction is also limited to +64 in the "up" direction for building. If you try to build above +64, those requests will be ignored. There doesn't seem to be a limit to how high you can fly, but there is nothing to see up there.
Let's Start Building Stuff
Now that we know how big the world is, it would be kind of nice to start fresh, and build something on a clean new world. I created a script for you called fresh_start.py. It lays out a clean grass field over the entire world, and erases everything above it by filling the space with AIR. It also marks the middle position with a GOLD_BLOCK. Using this nice clean space we can start building stuff.
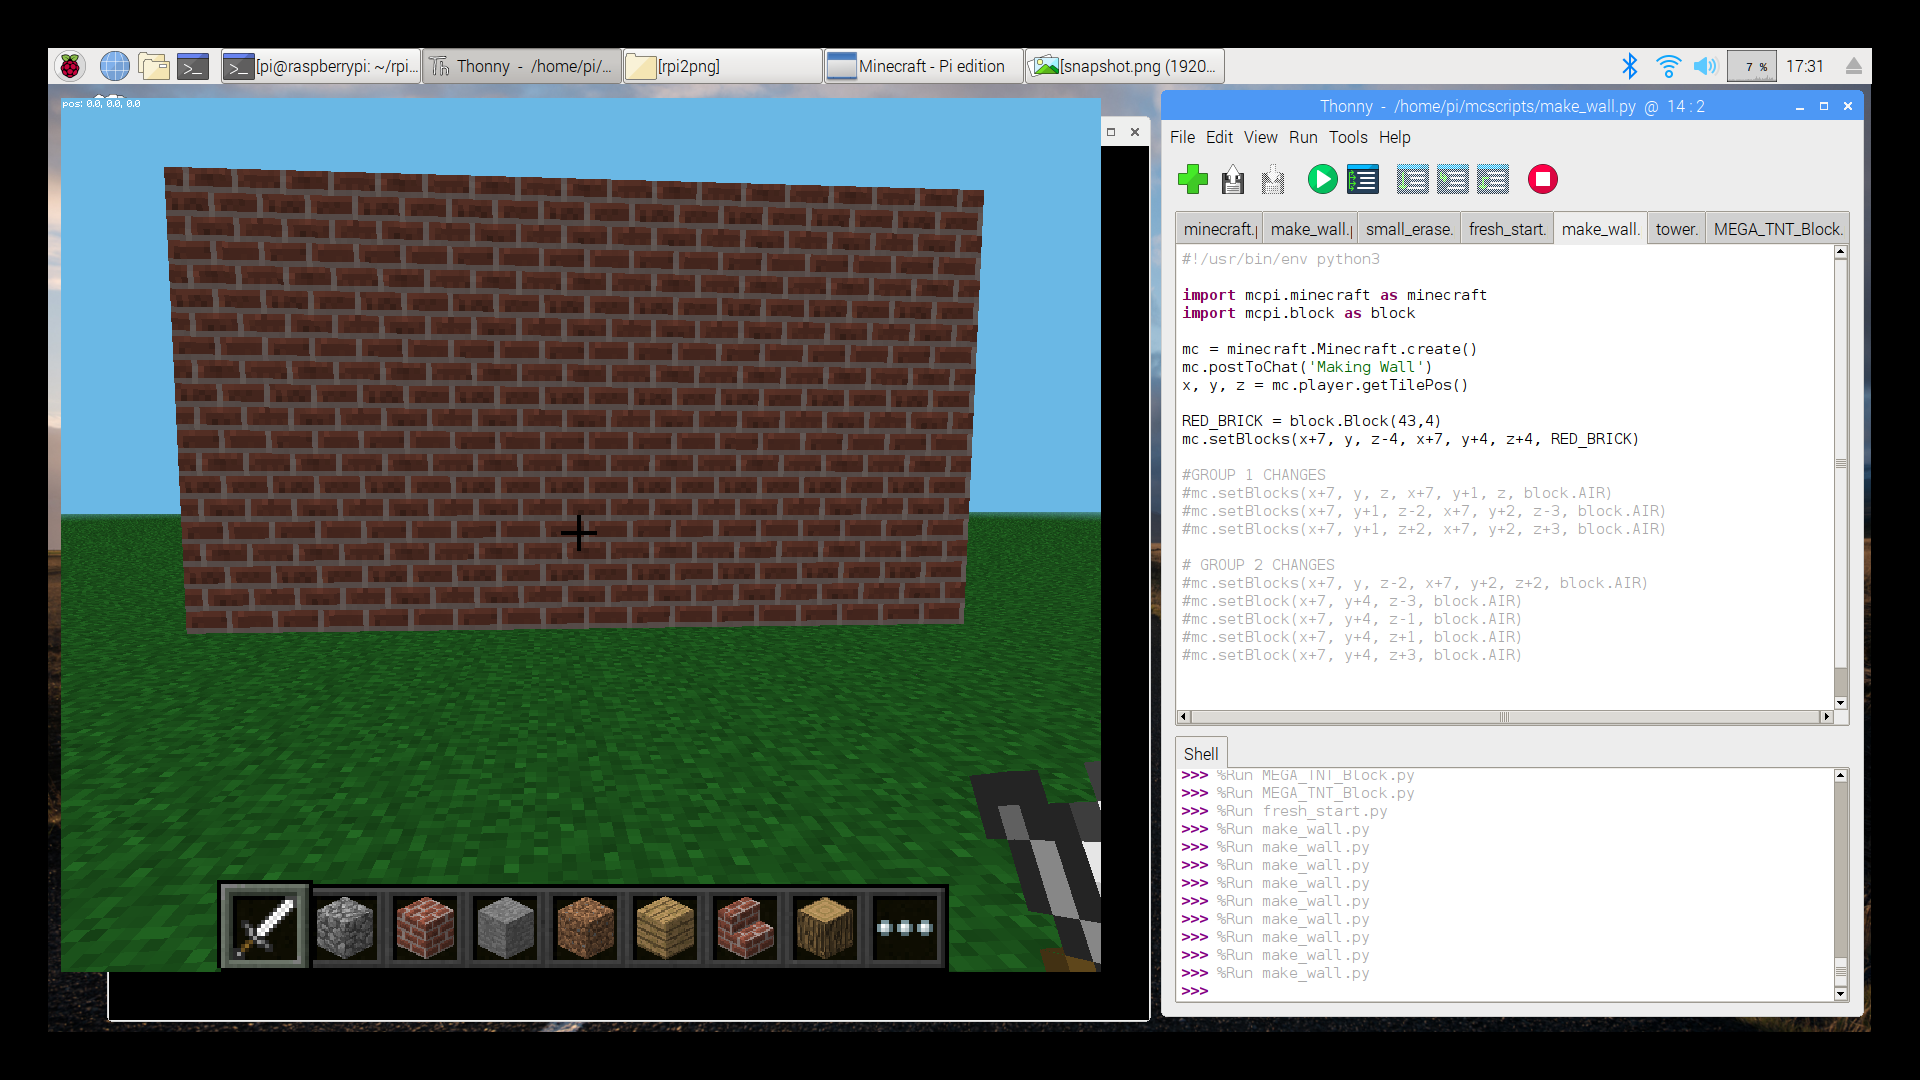
Let's start with something simple like a wall. Open the script called make_wall.py shown below. This will build a wall of RED_BRICK that is 7 blocks away from you, 9 blocks wide, and 7 blocks tall. It should look like this.
|
There are a couple of important things to notice in this script, which is shown below.
#!/usr/bin/env python3 import mcpi.minecraft as minecraft import mcpi.block as block mc = minecraft.Minecraft.create() mc.postToChat('Making Wall') x, y, z = mc.player.getTilePos() RED_BRICK = block.Block(43,4) mc.setBlocks(x+7, y, z-4, x+7, y+4, z+4, RED_BRICK) # GROUP 1 CHANGES #mc.setBlocks(x+7, y, z, x+7, y+1, z, block.AIR) #mc.setBlocks(x+7, y+1, z-2, x+7, y+2, z-3, block.AIR) #mc.setBlocks(x+7, y+1, z+2, x+7, y+2, z+3, block.AIR) # GROUP 2 CHANGES #mc.setBlocks(x+7, y, z-2, x+7, y+2, z+2, block.AIR) #mc.setBlock(x+7, y+4, z-3, block.AIR) #mc.setBlock(x+7, y+4, z-1, block.AIR) #mc.setBlock(x+7, y+4, z+1, block.AIR) #mc.setBlock(x+7, y+4, z+3, block.AIR) |
The first, is that there is a new block definition, which is "RED_BRICK = block.Block(43,4)". After I noticed that the library didn't have "active" TNT, I wrote a few Python programs to search through all of the blocks and I found a lot more.
If you run the script as is, you will get a red brick wall. But block 43 is one of those blocks that has many values. Try changing the data value in the script to values between 0 to 7. You should find that this block can be turned into lots of other blocks.
|
RED_BRICK = block.Block(43,4)
|
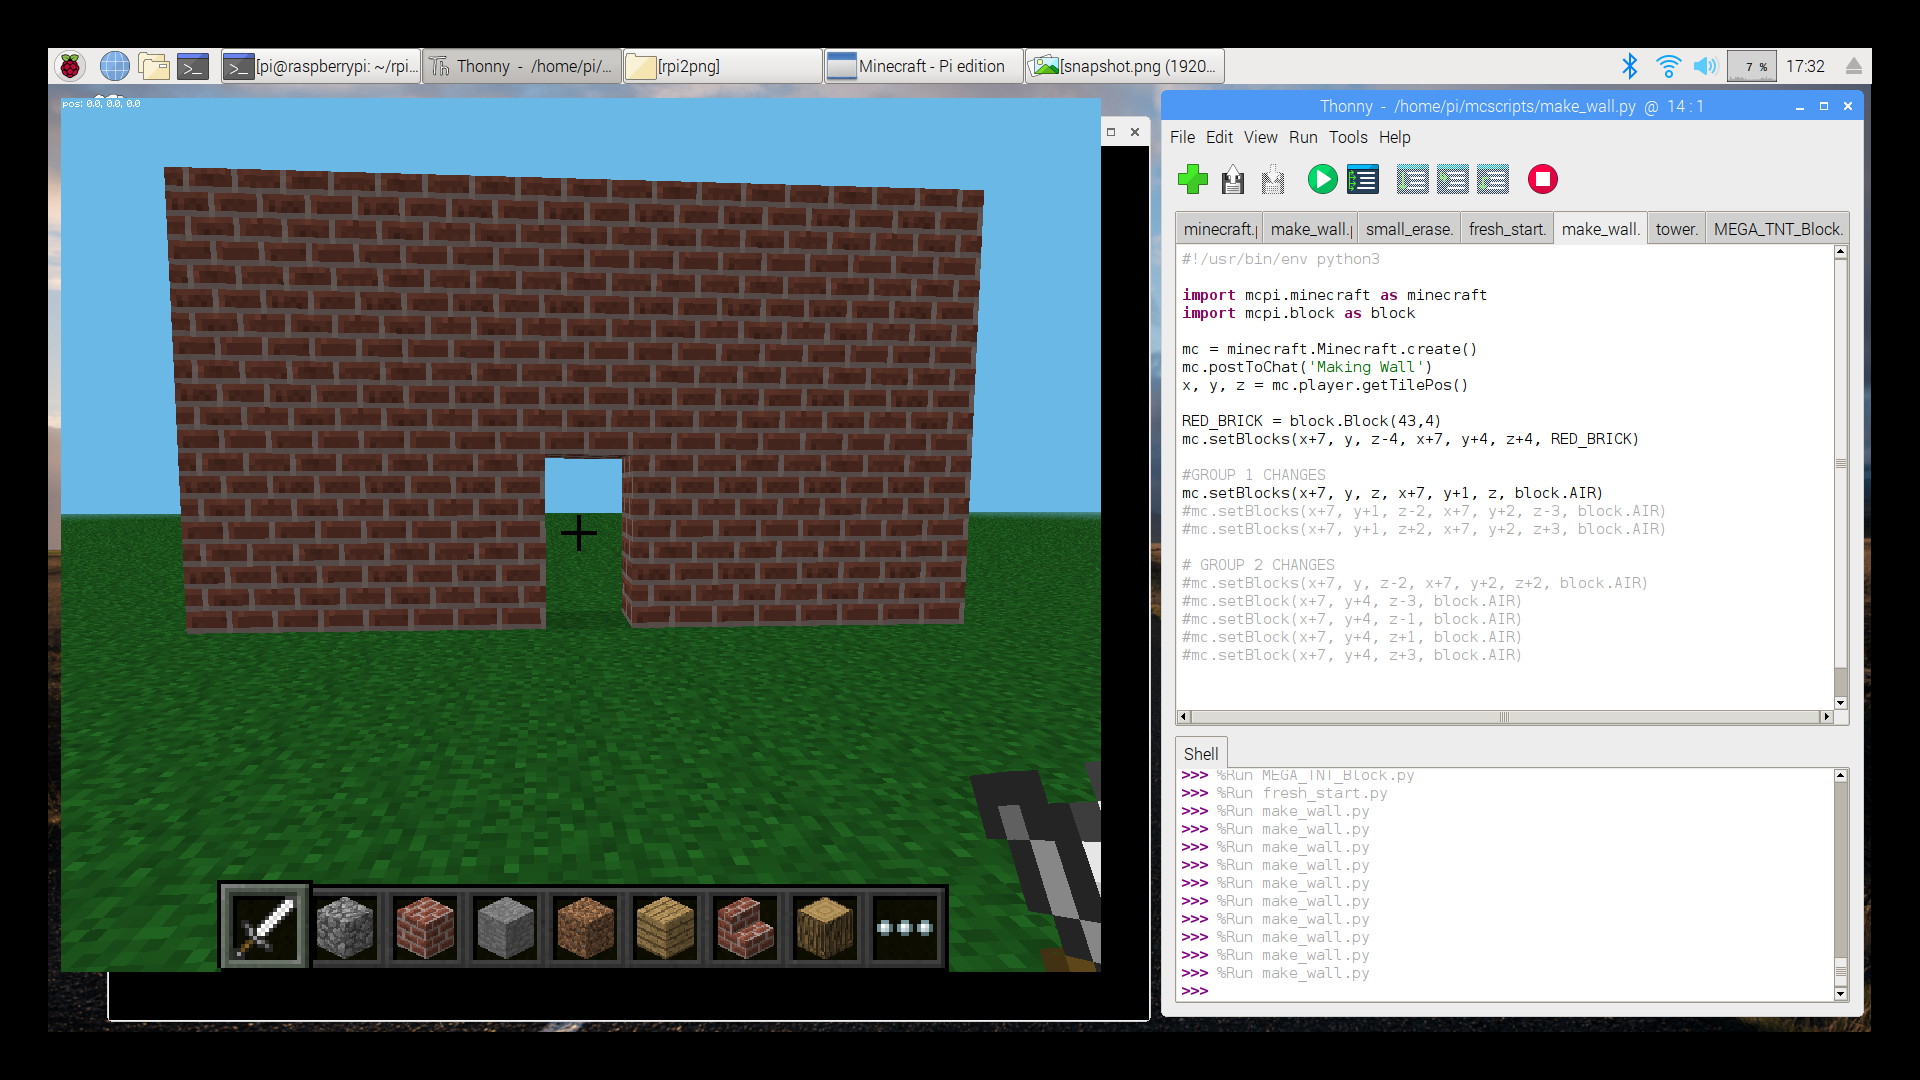
The second thing is that several lines are "commented out" using a hash mark #. When the hash mark is placed in front of something, Python will ignore it. This is a great way to add comments to remind yourself what a section of code does. For example, the line that says "# GROUP 1 CHANGES" is a comment. The has mark is also a great way to stop a line of code from executing without erasing it. That way it can be "turned off" and "turned on" easily. Let's try something. Go to the first line of code in the section called GROUP 1 CHANGES and un-comment it by deleting the hash mark. It should look like this.
# GROUP 1 CHANGES mc.setBlocks(x+7, y, z, x+7, y+1, z, block.AIR) #mc.setBlocks(x+7, y+1, z-2, x+7, y+2, z-3, block.AIR) #mc.setBlocks(x+7, y+1, z+2, x+7, y+2, z+3, block.AIR) |
Run the script. Did you get a door in the wall like this? Can you figure out how it happened? We used 2 blocks of air, stacked on top of each other, to "erase" the brick wall in the shape of a door. Try un-commenting the other other two lines in GROUP 1 CHANGES. Did you get two windows? Try changing some of the values and change the size of the door and windows. When you are done, try commenting all three of the lines of code again by adding a hash mark # in front of the 3 lines. When you run the script again, do you get a regular brick wall again? Perfect. Then you are ready for the next part.
|
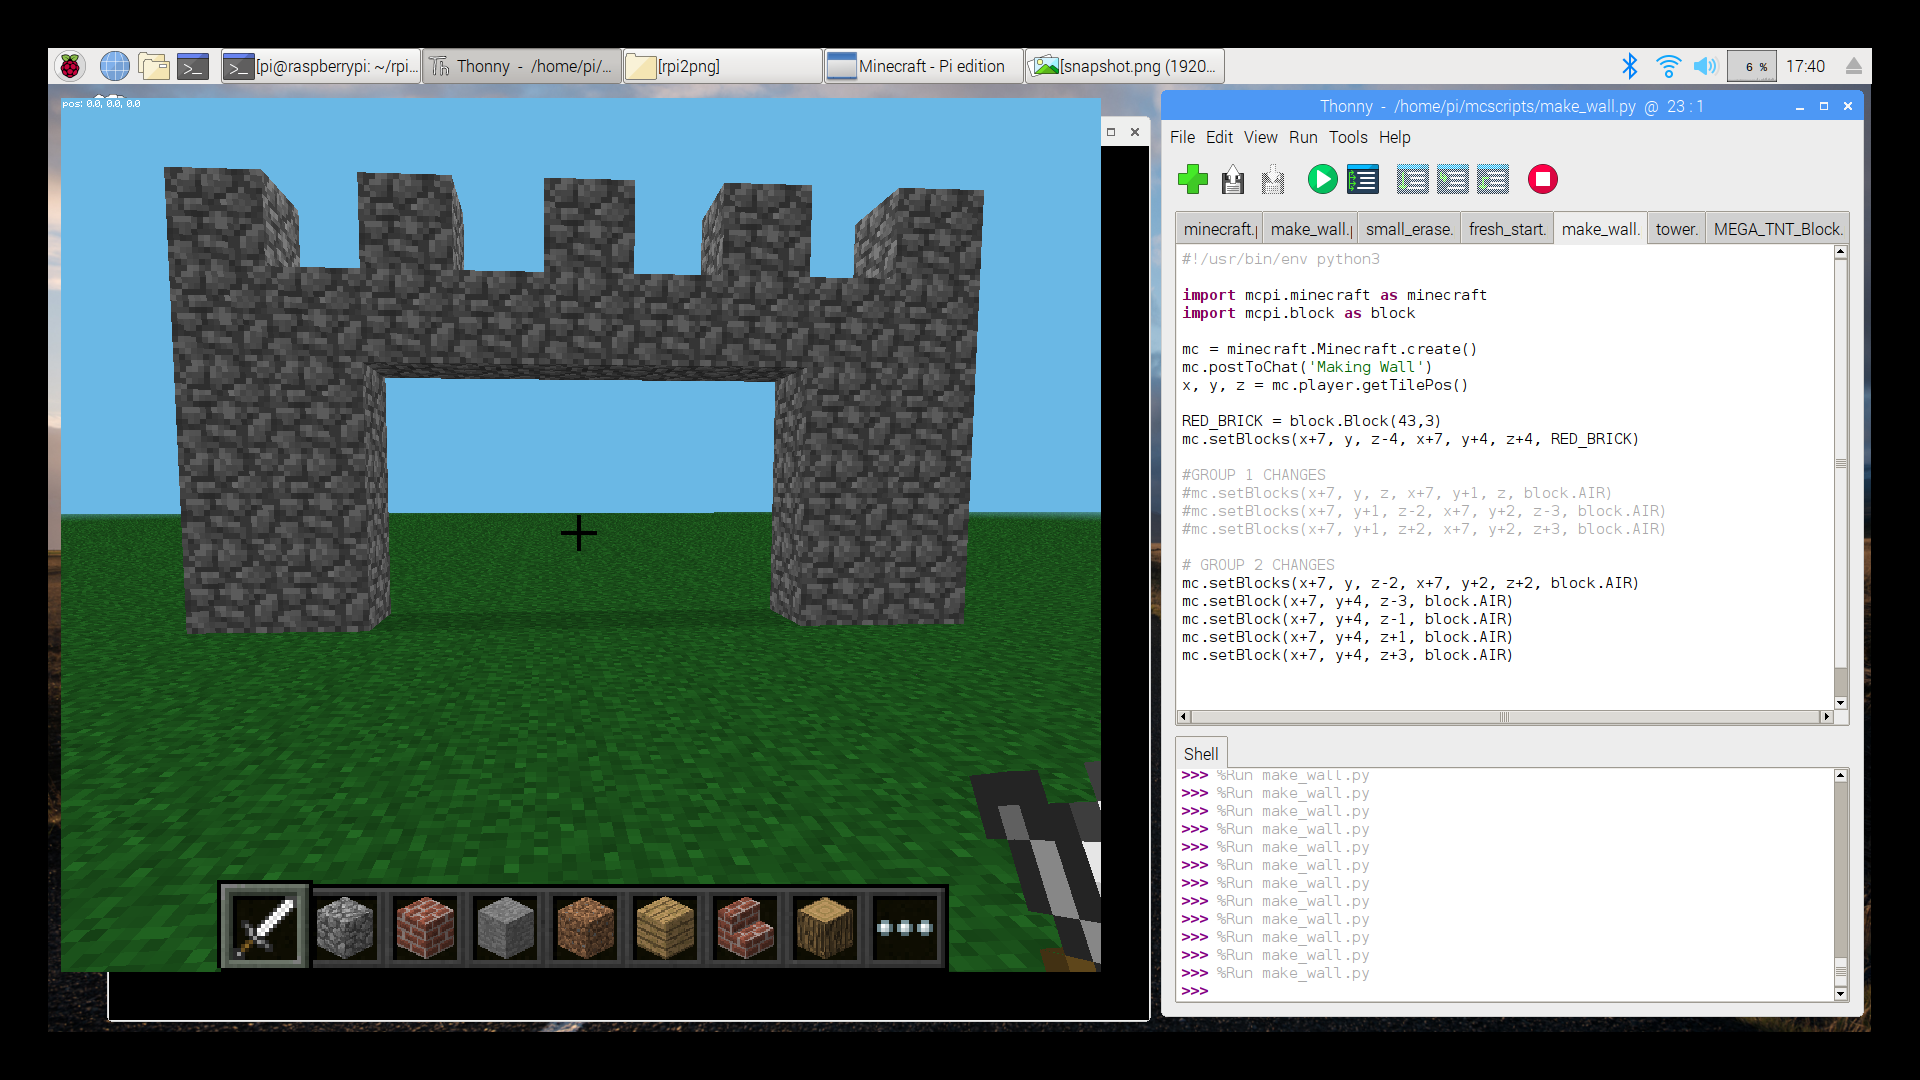
Try this. Change the definition of RED_BRICK from Block(43,4) to Block(43,3), and uncomment the first line of the GROUP 2 CHANGES. The changed area should look like this.
RED_BRICK = block.Block(43,3) mc.setBlocks(x+7, y, z-4, x+7, y+4, z+4, RED_BRICK) # GROUP 1 CHANGES #mc.setBlocks(x+7, y, z, x+7, y+1, z, block.AIR) #mc.setBlocks(x+7, y+1, z-2, x+7, y+2, z-3, block.AIR) #mc.setBlocks(x+7, y+1, z+2, x+7, y+2, z+3, block.AIR) # GROUP 2 CHANGES mc.setBlocks(x+7, y, z-2, x+7, y+2, z+2, block.AIR) #mc.setBlock(x+7, y+4, z-3, block.AIR) #mc.setBlock(x+7, y+4, z-1, block.AIR) #mc.setBlock(x+7, y+4, z+1, block.AIR) #mc.setBlock(x+7, y+4, z+3, block.AIR) |
Did you get something that looked kind of like a castle wall? Hmmm... I think I know what would make that even better. Try uncommenting the rest of the lines in GROUP 2 CHANGES. Run the script again. Did you get this?
|
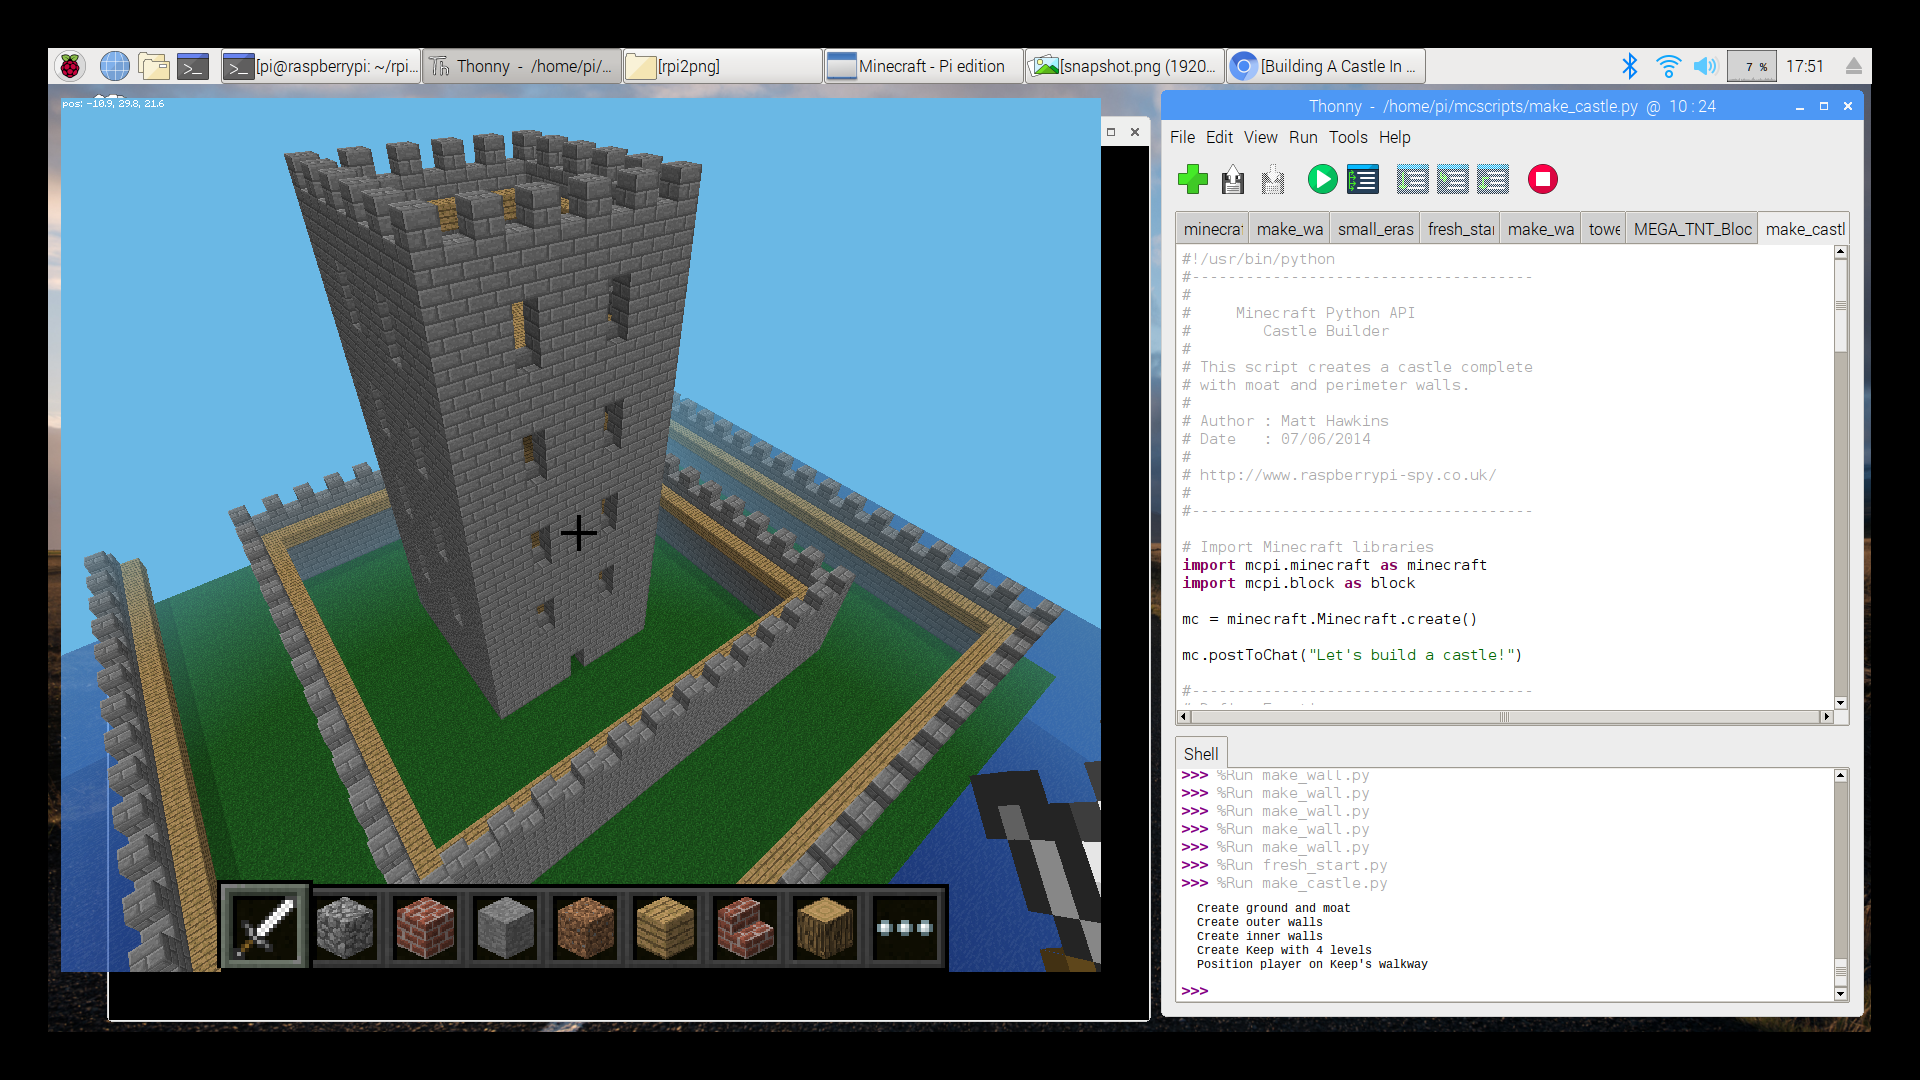
Speaking of castles, here is a great example of a castle that I found on the internet here. I saved this script to your computer as "make_castle.py". If you break through the floor on the top of the tower, you'll find another room. in fact there are rooms at each level. It's nicely done. Do you know what would make this even better? Stairs between the floors. I don't expect you to be able to do this now. But after you've played around with coding for a while, and you are looking for a challenge, perhaps we'll come back and work on this.
|
If you look at the script for the castle, you are going to see several things that I haven't explained like "def", "if" and "for" statements. These are parts of the Python programming language. When you learn Python you will realize that there are things in the programming language that will allow you to automate the creation of repetative things like walls and rooms. Even though you may not understand all of it, if you look at the size of the script, it makes a lot of castle for not a lot of code. This is because repeating things like making levels in the castle is what coding does well.
#!/usr/bin/python #-------------------------------------- # # Minecraft Python API # Castle Builder # # This script creates a castle complete # with moat and perimeter walls. # # Author : Matt Hawkins # Date : 07/06/2014 # # https://www.raspberrypi-spy.co.uk/ # #-------------------------------------- # Import Minecraft libraries import mcpi.minecraft as minecraft import mcpi.block as block mc = minecraft.Minecraft.create() mc.postToChat("Let's build a castle!") #-------------------------------------- # Define Functions #-------------------------------------- def CreateWalls(size,baseheight,height,material,battlements,walkway): # Create 4 walls with a specified width, height and material. # Battlements and walkways can also be added to the top edges. mc.setBlocks(-size,baseheight+1,-size,size,baseheight+height,-size,material) mc.setBlocks(-size,baseheight+1,-size,-size,baseheight+height,size,material) mc.setBlocks(size,baseheight+1,size,-size,baseheight+height,size,material) mc.setBlocks(size,baseheight+1,size,size,baseheight+height,-size,material) # Add battlements to top edge if battlements==True: for x in range(0,(2*size)+1,2): mc.setBlock(size,baseheight+height+1,(x-size),material) mc.setBlock(-size,baseheight+height+1,(x-size),material) mc.setBlock((x-size),baseheight+height+1,size,material) mc.setBlock((x-size),baseheight+height+1,-size,material) # Add wooden walkways if walkway==True: mc.setBlocks(-size+1,baseheight+height-1,size-1,size-1,baseheight+height-1,size-1,block.WOOD_PLANKS) mc.setBlocks(-size+1,baseheight+height-1,-size+1,size-1,baseheight+height-1,-size+1,block.WOOD_PLANKS) mc.setBlocks(-size+1,baseheight+height-1,-size+1,-size+1,baseheight+height-1,size-1,block.WOOD_PLANKS) mc.setBlocks(size-1,baseheight+height-1,-size+1,size-1,baseheight+height-1,size-1,block.WOOD_PLANKS) def CreateLandscape(moatwidth,moatdepth,islandwidth): # Set upper half to air mc.setBlocks(-128,1,-128,128,128,128,block.AIR) # Set lower half of world to dirt with a layer of grass mc.setBlocks(-128,-1,-128,128,-128,128,block.DIRT) mc.setBlocks(-128,0,-128,128,0,128,block.GRASS) # Create water moat mc.setBlocks(-moatwidth,0,-moatwidth,moatwidth,-moatdepth,moatwidth,block.WATER) # Create island inside moat mc.setBlocks(-islandwidth,0,-islandwidth,islandwidth,1,islandwidth,block.GRASS) def CreateKeep(size,baseheight,levels): # Create a keep with a specified number # of floors levels and a roof height=(levels*5)+5 CreateWalls(size,baseheight,height,block.STONE_BRICK,True,True) # Floors & Windows for level in range(1,levels+1): mc.setBlocks(-size+1,(level*5)+baseheight,-size+1,size-1,(level*5)+baseheight,size-1,block.WOOD_PLANKS) # Windows for level in range(1,levels+1): CreateWindows(0,(level*5)+baseheight+2,size,"N") CreateWindows(0,(level*5)+baseheight+2,-size,"S") CreateWindows(-size,(level*5)+baseheight+2,0,"W") CreateWindows(size,(level*5)+baseheight+2,0,"E") # Door mc.setBlocks(0,baseheight+1,size,0,baseheight+2,size,block.AIR) def CreateWindows(x,y,z,dir): if dir=="N" or dir=="S": z1=z z2=z x1=x-2 x2=x+2 if dir=="E" or dir=="W": z1=z-2 z2=z+2 x1=x x2=x mc.setBlocks(x1,y,z1,x1,y+1,z1,block.AIR) mc.setBlocks(x2,y,z2,x2,y+1,z2,block.AIR) if dir=="N": a=3 if dir=="S": a=2 if dir=="W": a=0 if dir=="E": a=1 mc.setBlock(x1,y-1,z1,109,a) mc.setBlock(x2,y-1,z2,109,a) #-------------------------------------- # # Main Script # #-------------------------------------- print("Create ground and moat") CreateLandscape(33,10,23) print("Create outer walls") CreateWalls(21,1,5,block.STONE_BRICK,True,True) print("Create inner walls") CreateWalls(13,1,6,block.STONE_BRICK,True,True) print("Create Keep with 4 levels") CreateKeep(5,1,4) print("Position player on Keep's walkway") mc.player.setPos(0,30,4) |
Let's try changing a few things. First save the make_castle script with a new name. Then find the line of code at the bottom of the script that says CreateKeep(5,1,4), and try changing the last number to something larger, like 7. Before you run the script, change one more thing. On the last line that sets the players position, change the x value from 0 to 10. The reason for this is that currently the player is placed above the castle after it is built. The last number in CreateKeep controls how many levels are built. If you build the castle taller, and put the player in the old position, they will end up inside of a wall.
Since you made a copy of the script you can always open the old script, rename it again, and start over. That makes it safe to change as much stuff as you want. Have fun. Explore and try stuff. If you break it, just start over.
print("Create Keep with 4 levels")
CreateKeep(5,1,7)

print("Position player on Keep's walkway")
mc.player.setPos(10,30,4)
|
There are a lot more things to discover, but the intention of this page was just to get you started. Don't worry too much about the Python coding. There is plenty of time for that. For now, focus on the number of blocks that are available, and all of the creative things that you can make with them. Getting fast at making blocks and placing them where you want will take a little time. But I know that you'll get the hang of it.
Here is another link to the complete list of blocks.
In the time that I've been putting together this web page for you, I've run into a few surprises. Some of the blocks have rules, or interact with other blocks in ways I didn't expect. With your knowledge of the game, and now with the ability to make the game do what you want, you should be able to do some really cool things.
I'm really excited to see what you make, and most of all, I hope you have fun!